Scout Award
Scout Movement in Sri Lanka
Know in brief, the history of the Scout Movement in Sri Lanka
In 1912, just five years after the formation of Scouting in England in 1907 by its founder Lord Baden Powell, Francis George Stevens, District Civil Engineer, planted the seed of Scouting in Sri Lanka (then Ceylon) by forming the first-ever Scout Troop at Christ Church College, Matale in the Central Province with a group of 8 boys. Francis George Stevens was born in Tavistock, Devon, England on 2nd of June, 1891.Parents were Mr and Mrs Lambert Stevens of Liverpool.

At a time when Sri Lanka was a colony of the British Empire, an English engineer by the name F.G. Stevens was posted at Christ Church, Matale, a town approximately 100km North East of Colombo. His residence being right next door to the Christ Church Missionary School, he faced many a problem as the students made full of his garden and everything there. After problems including missing fruits and the constant disturbance of his much needed rest, he decided to do something about putting the boy's "spare time" to better use. Thus he came up with the idea starting a "Boy Scout Corps," already a major success in England.
1912 - Scouting in Sri Lanka by F.G. Stevens (1st Chief Commissioner of Sri Lanka) at Christ Church College, Matale.
1914 - Scouting brought to Colombo by F.G. Stevens, at Christ Church, Galle Face, Colombo.
1914 - F.G. Stevans established the 1st Galle Mahinda Scout Group at Mahinda College, Galle
1915 – First Scout Census
1916 - Cub Scouting Started. Western Province Rally at Havelock Park, Colombo.
1917 - First all Ceylon Rally at Havelock Race Course, Colombo.
1917 - F. G. Stevans was awardedn the SIlver wolf on the eve of his departure to Egypt on War Service by Lord Baden-Powell
1918 - Sea Scouting started in Sri Lanka at Trincomalee
1919 - First competition for the King's flag and was won by Kandy Dharmaraja College.
1920 - Senior Scouting started. Ceylon represented for the 1st time at an International Jamboree. (The 1st Imperial Jamboree in Olympia, U.K.)
1921 - B.P.'s visit to Sri Lanka. An all Scout and Guide Rally was held at Galle Face Green to welcome him. Scouting started in Prisons.
1924 - First Wood Badge Course in Mutwal.
1925 - The First Wood Badge awarded to a Ceylon scout by Gilwell. Vernon Grenier becomes Chief Commissioner.
1930 - First Wood Badge Course in Sinhala. Scout HQ moves to an old guardroom at Galle Face, Colombo.
1932 - All Ceylon Scout Craft exhibition at Katugastota, Kandy. J.H. De Saram becomes Chief Commissioner.
1934 - Second visit of Lord B.P. First visit of Lady B.P.
1942 - K. Somasundaram becomes Chief Commissioner.
1945 - Scout Head Quarters moved to Baladaksha Mawatha (Opposite Army HQ Slave Island)
1948 - Col. C.P. Jayawardene becomes the Chief Commissioner. New Buildings of National Headquarters. Pedro Camp-site at Nuwera-Eliya opened. Job Week scheme started. First Rover Moot held in Kandy. Sinhala and Tamil edition of Scouting for Boys published.
1952 - Ceylon Jamboree (1st National Jamboree) at Kumbi Kale (near the present BMICH, Colombo) to celebrate 40 years in Scouting.
1953 - International Status awarded to Ceylon Scouting (Ceylon Scout Association)
1954 - E.W. Kannangara becomes Chief Commissioner.
1957 - Taking part in Jubilee Jamboree in England. Scout Council Act of Incorporation passed in Parliament (Recognized by the Parliament as an incorporated organization). Mr. Gerald Fernando joined the World Scout Bureau.
1958 - Second visit of Lady Olave Baden Powell.
1962 - Golden Jubilee Jamboree (2nd National Jamboree) at Race Course, Colombo.
1967 - Fitzroy H. Gunesekera becomes Chief Commissioner.
1968 - Third visit of Lady B.P. to Sri Lanka.
1972 - Diamond Jubilee at Bogambara, Gampola. C.M.P. Wanigatunga becomes Chief Commissioner.
1977 - H. Ratnasuriya becomes Chief Commissioner. National HQ shifted to Chithampalan Gardiner Mawatha.
1982 - Theodore Seneviratne becomes Chief Commissioner. Special Commemorative Stamp in honour of B.P. on 125th Birth Anniversary.
1983 - 3rd National Jamboree at Anuradhapura.
1984 - 2nd National Cubboree.
1987 - Rex Jayasinghe becomes Chief Commissioner.
1990 - 1st SAARC Jamboree at Vihara Maha Devi Park, Colombo. Chief Commissioner Rex Jayasinghe dies just before Jamboree. J. Lionel Silva becomes Chief Commissioner.
1992 - 4th National Jamboree in Kurunegala. M. Mazzahim Mohideen becomes Chief Commissioner.
1997 - K.H. Camillus Fernando becomes Chief Commissioner.
1998 - 5th National Jamboree, Pallekelle, Kandy.
2002 - 6th National Jamboree held in Balapitiya to celebrate 90 years in Sri Lankan Scouting. H.S. Weerakoon was appointed as Chief Commissioner.
2006 - 7th National Jamboree at Nuwara Eliya.
2007 - World Scout Centenary. Mr. C. Batuwangala was appointed as Chief Commissioner.
2010 - 8th National Jamboree at Angunukolapelessa, Hambantota.
2012 - Sri Lankan Scout Centenary Year (1912-2012). 29th Asia Pacific Regional and Sri Lankan Centenary Scout Jamboree held at Dambulla.Professor Nimal De Silva becomes the 18th Chief Commissioner
2014 – 8th Asia-Pacific Regional Scout Leaders Summit 2014 at Gold Sands Hotel, Negombo.Colombo Centenary International Scout Jamboree (CCISJ 2014) at Madampe.Formed ‘Singithi Scouts’ section for the kids of 5 ½ to 7 years of age.
2017 - Merrille Goonetilleke becomes the 19th Chief Commissioner. Janaprith Fernando was the first Sri Lankan elected to the World Scout Committee, the highest governing body of World Organization of the Scout Movement.
2020 - Major General Milinda Peiris assumed duties as the 20th Chief Scout Commissioner.
2021 - Janaprith Fernando becomes the 20th Chief Commissioner
Scout Districts
There are a total of 37 Scout Districts in Sri Lanka.
Colombo
Kurunegala
Wattala-Jaela
Galle
Matara
Kandy
Chilaw
Gampaha
Anuradhapura
Negombo
Homagama
Matale
Kaluthara
Kegalle
Avissawella
Badulla
Batticaloa
Puttalam
Point Pedro
Nawalapitiya
Trincomalee
Wennapuuwa
Rathnapura
Polonnaruwa
Panadura
Vavuniya
Nuwara Eliya
Kilinochchi
Jaffna
Kankasanthurai
Monaragala
Mannar
Moratuwa-Piliyandala
Hambanthota
Mulativu
Ampara
Akkaraipaththu-Kalmunai

National Commissioners

You can refer this link to know about the National Commissioners and this link to know about the council
National Flag and National symbols

The National Flag of Sri Lanka represents the country and her heritage as a rallying device that integrates the minority races with the majority race.
The flag is an improvisation of the civil standard of the last king of Sri Lanka, Sri Wickrama Rajasingha.
The civil standard had a passant royal lion with a sword in it's right fore paw at the center, and a bo-leaf on each of the four corners on a plain border.
When Sri Lanka gained her independence from Great Britain on February 4, 1948, it was the lion flag of the last king of Sri Lanka that was hoisted.
The first Prime Minister of independent Sri Lanka, D.S.Senanayake, appointed a committee to advice the government on the design of a new national flag. The design approved by the committee in February 1950 retained the symbol of the lion with the sword and the bo-leaves from the civil standard of the last king of Sri Lanka, with the inclusion of two vertical stripes green and orange in colour.
The significance of each symbol of the national flag is as follows:
The lion in the flag represents the Sinhala race.
The sword of the lion represents the sovereignty of the country.
Curly hair on the lion's head indicates religious observance, wisdom and meditation.
The beard denotes purity of words.
The handle of the sword highlights the elements of water, fire, air and earth.
The nose indicates intelligence.
The two front paws purport to purity in handling wealth.
The vertical stripe of orange represents the minority Tamil race and the green vertical stripe the minority Muslim race.
The border round the flag, which is yellow in colour, represents other minor races.
The bo-leaves at the four corners of the flag represent Buddhism and it's influence on the nation. They also stand for the four virtues - Kindness, Friendliness, Happiness and Equanimity.
The maroon coloured portion of the flag manifests the other minor religions.

The national flag was hoisted for the first time on March 3, 1950.
Occasions for Display of the National Flag
The National Flag should be displayed-
on days of National importance, such as the National Dat and on such other days as are prescribed by the Government
at all State functions
When displayed Outdoors,
Whenever the National Flag is flown, it should occupy the position of honour and be distinctly placed.
On the occasion of a visit of a foreign Head of State/Government when his/her National Flag is displayed the Sri Lanka National Flag also should be displayed.
The National Flag should always be hoisted slowly and ceremoniously as for lowering.
The National Flag should be flown with the two vertical stripes next to the flag-pole. (Figure1)

The National Flag must be given pride of the place. No other flag should be placed over it. If there are flags of other nations they should be flown at same level and to the left of the National Flag of Sri Lanka, with all the flag masts being of equal height. Flags should be of approximately equal size but generally not larger than the National Flag. International usage forbids the display of the flag of one nation above that of another nation in time of peace. (Figure 2)

Religious flags should be displayed at the same level. (Figure 3)

The flag may be flown on buildings at night also but only on very special occasions. On all such occasions, the flag should always be floodlit while it remains hoisted.
When a number of flags of localities or pennants of societies, school and club flags, etc., are grouped and displayed from staffs with the National Flag, the National Flag should be at the centre and at the highest point in the group. (Figure 4)

When flags are flown from adjacent staffs, the National Flag should be hoisted first and lowered last.
When the National flag is displayed from a staff projecting from a windowsill, balcony or front of a building, the flag should be placed at the peak of the staff unless the flag is at half-mast. The staff should be at an angle 45 degrees and not horizontal. (Figure 5)

When the National Flag is displayed over the middle of a street it should be flown horizontally along its length with the lion upright. (Figure 6)

On days of national mourning the National Flag should be flown at half-mast The National Flag when flown at half-mist should be first hoisted to the peak for an instant then lowered to the half-mast position, but before lowering the National Flag for the day it should be raised again to the peak. Whenever the flag is required to be half masted it is to be lowered a third of the height of the mast as measured from the peak of the mast. The occasions on which the National Flag should be flown at half-mast will be decided by the Government. (Figure 7)

Display in Processions :
The National Flag should never be carried flat or horizontal but always aloft and free.
The National Flag when carried in procession with another flag should be on the marching right. If there is another line of other flags the National Flag should be in front of the centre of that line. (Figure 8)
The National Flag should not be dipped to any person or object. Regimental colours, flags of schools and organizations or institutional flags are dipped as a mark of honour but not the National Flag.

Ceremonial hoisting of the National Flag:
The National Flag should be attached to the halyard before hoisting and the flag should be folded and either placed on a high object(never on the ground) or held by hand.
The flag should be hoisted only from the pocket and not from the the fly. Hanging the National Flag on a string will therefore be inappropriate. When flying from the pocket the masts should be vetical or at an angle if projecting from a building on a staff towards a roadway or compound.
The chief guest at the function should hoist the National Flag smartly. During the ceremony all should stand attention, face the flag and refrain from smoking, drinking, eating, conversing, laughing or acting in a way that distracts from the solemnity of the occasion. Service personnel in uniform will salute as prescribed in respective service orders. (Figure 9)

During the ceremony the playing magul bera and blowing of the traditional conch shell should be encouraged whenever possible. No other music should be played. (Figure 1)
Immediately after the National Flag is hoisted the National Anthem should be played or sung by a choir and preferably by all those present.
During rendition of the National Anthem when the National Flag is displayed all persons present except those is uniform should stand attention facing the National Flag. Persons in uniform should render the appropriate salute. Men not in uniform wearing head-dress and not saluting should remove their head-dress.
National Sport

Sport in Sri Lanka is a significant part of Sri Lankan culture. Volleyball is the national sport in Sri Lanka. Cricket is the most popular sport in Sri Lanka. Rugby union is also popular. Other popular sports are water sports, badminton, athletics, football, basketball and tennis. Sri Lanka’s schools and colleges regularly organize sports and athletics teams, competing on provincial and national levels.
The game of Volleyball was introduced to Sri Lanka (then Ceylon) in 1916 by Mr R.W. Camack the then Director of Physical Education at the Colombo Y.M.C.A. However there is evidence that Sri Lanka was playing a similar game long before this introduction. Mr Camack also demonstrated and instructed how to play the game initially to Teacher Trainees of the Teaching Training College and students of the school around Colombo.
National Flower

The Water Lily is a beautiful flower which is usually violet-blue in color with reddish edges. The plant has been used since ancient times to enhance the beauty of ponds. Some varieties have white, purple, mauve, or fuchsia-colored flowers. Water Lily is native to southern and eastern parts of Asia.
The beautiful Nil Manel or blue water lily, was declared as the national flower of Sri Lanka in 1986. Again in 2016, the national flower was officially announced as the Water Lily, more commonly known as the Manel flower, and not limited to the Nil Manel. According to Buddhist legends, this flower was one of the 108 auspicious signs found on Prince Siddhartha’s footprint. It is said that when Lord Buddha died, lotus flowers blossomed everywhere that he had walked in his lifetime.
National Tree

Scientific name : Mesua ferrea
Na Tree was decided as the National Tree of Sri Lanka on February 26, 1986, because this tree is most closely related to the Sri Lankan people socially and habitually for thousands of years. This tree has special value for the people of Sri Lanka. This is closely related to the Sri Lankan people in some centuries before who did not use it a little like an ancient Aryuveda medicinal plant, wooden buildings in ancient temples and bridges.
The flowers are among the parts of worship in religious rituals and adorn the national park with the beauty of trees and flowers. In Indonesia alone, especially in Java, the Na Tree, known as the Nagasari tree, has little benefit in both its wood and fruit and flowers. Some ethnic groups believe it is a repellent tree.
This tree which is a rare plant in Sri Lanka is one of the fortified species because of its connection with national identity and Sri Lanka’s strong commitment to preserving the environment.
The flowers are white, fragrant, and are used as herbal ingredients. While the wood is the hardest and longest so that it is not used little for temples, bridges and so on in the past.
The shape of the leaves varies, from thin to thick, measuring 1 × 5 cm to 5 × 18 cm, but often 3 × 10 cm. The leaves are narrow, elongated, oval, long and pointed round. Young leaves at the top are pink and turn green if they are old. The combination that creates the Na tree looks beautiful.
Buah Na is an oval capsule containing 1-3 seeds. The fruit and seeds of Na contain 76% oil and have a high value because they can be used as medicine.
Na trees can be up to 30 meters high and 70 cm in diameter. The inner skin is dark brown. The next coat is filamentous reddish brown and publishes clear color sap. The brown wood is pseudo-brown in pink. The hardwood is red, hardest, solid and thick — the smallest branch, round and hard to see.
National Bird

The Sri Lankan Jungle fowl (Gallus lafeyetii) was first described in 1831 by Lesson and is a member of the family Gallus, the same family as the domestic chicken. The ancestor to all domestic chickens is the Red Jungle fowl (Gallus gallus). It has the distinct honor of being the national bird of Sri Lanka and is depicted in postage stamps etc. There are 4 species of Gallus so far recorded from Asia. The Red jungle fowl (Gallus gallus), the Grey jungle fowl (Gallus sonneratii), the green jungle fowl (Gallus varius) and the Sri Lankan jungle fowl (Gallus lafeyetii). The Sri Lanka Jungle fowl is endemic to Sri Lanka, and is not found anywhere else in the world.
As the norm for the genus Gallus, the males and females can be easily identified due to their different colours. Males are reddish orange to yellow in colour, sporting a red comb (crest) and a yellow patch in the centre. Their tail is metallic blue-black. The females are usually different shades of brown in colour with black markings and buff bands on top. They have reddish-brown and black wavy lines, streaked with brownish-buff below, and the rest being largely black-streaked.
The Jungle fowl is a terrestrial species, and is found always scratching the ground for food as with the domestic chicken. They are omnivorous by habit and feed on a myriad of food, ranging from worms, fruits, frogs, and other vertebrates and invertebrates.
The female lays 2 to 4 eggs on nests abandoned by other birds or even squirrels, or on nests built on the forest floor of Sri Lanka's hill country. Males play an active role in protecting the nests an in rearing chicks.
The call of the Jungle fowl is said to sound like the name John Joyce, which is repeated every few seconds. They are also known to flap their wings, this sound is made when a male announces his arrival or when there is a territorial dispute amongst males.
Emblem of Sri Lanka

The national emblem of Sri Lanka is used by the State of Sri Lanka and the Sri Lankan government in connection with the administration and government of the country. The current emblem has been in use since 1972 and created under the ideas and guidance of Nissanka Wijeyeratne. At the time, he was Permanent Secretary to the Ministry of Cultural Affairs and Chairman of the National Emblem and Flag Design Committee. The designer of the emblem was Venerable Mapalagama Wipulasara Maha Thera, and the artwork was by S. M. Seneviratne.
The emblem features a gold lion passant, holding a sword in its right fore paw (the same lion from the flag of Sri Lanka) in the centre on a maroon background surrounded by golden petals of a Blue Lotus the national flower of the country. This is placed on top of a traditional grain vase that sprouts sheaves of rice grains that circle the border reflecting prosperity.
The crest is the Dharmachakra, symbolizing the country's foremost place for Buddhism and just rule. Traditional Sinhalese heraldic symbols for the sun and the moon form the supporters. Sun and Moon, and Lion depicting.
Rules of Health 2

As a young teen, taking care of your health is essential for your physical and emotional well-being. Here are some rules to follow:
Eat a Balanced Diet: Maintain a balanced and nutritious diet with plenty of fruits, vegetables, whole grains, lean proteins, and dairy. Limit sugary, processed, and high-fat foods.
Stay Hydrated: Drink plenty of water throughout the day to keep your body properly hydrated.
Get Enough Sleep: Aim for 8-10 hours of sleep each night to support your growth, cognitive function, and overall well-being.
Regular Physical Activity: Engage in at least 60 minutes of physical activity daily. It can include activities like sports, biking, dancing, or even walking.
Limit Screen Time: Minimize excessive screen time from devices like phones, computers, and TVs, as it can negatively impact your sleep and overall health.
Practice Good Hygiene: Maintain good personal hygiene by regularly washing your hands, taking showers, and brushing your teeth.
Protect Your Skin: Use sunscreen when outdoors to protect your skin from harmful UV rays.
Avoid Smoking and Substance Abuse: Stay away from smoking, alcohol, and drugs, as they can have serious negative effects on your health.
Manage Stress: Learn healthy ways to manage stress, such as through relaxation techniques, hobbies, or spending time with friends and family.
Regular Health Check-ups: Schedule regular check-ups with your healthcare provider to monitor your health and address any concerns.
Wear Safety Gear: Use appropriate safety gear when engaging in sports or physical activities to prevent injuries.
Be Mindful of Mental Health: Pay attention to your emotional well-being and seek help if you're struggling with stress, anxiety, or depression.
Be Sun Smart: Wear protective clothing and sunglasses when out in the sun for extended periods to shield yourself from harmful rays.
Build Healthy Relationships: Surround yourself with supportive and positive influences, and avoid toxic relationships that can harm your mental health.
Remember, these rules of health are meant to promote your overall well-being as a young teen and set the foundation for a healthy lifestyle as you grow into adulthood. It's important to make these practices a regular part of your daily life. If you have specific health concerns or questions, don't hesitate to talk to a trusted adult or healthcare professional for guidance and support.
Correct Posture and Habits
The Importance of Posture
You may have heard that good posture is essential for good health, but do you know why? Posture refers to how you position your body when you’re sitting, standing, or lying down. Your posture is the result of habits formed over the course of years.
Many people may recognize poor posture in others without realizing how their own falls short. If you look around at co-workers at the office, you’ll likely find them hunched over at their desks. Learn why good posture matters — and what you can do to improve yours.
What is good posture ?
Good posture is the proper alignment of your body when standing or sitting. Correct positioning involves training yourself to hold your body against gravity with the least strain and tension on supportive structures, such as your muscles and ligaments. Proper posture keeps your bones and joints in optimal alignment and decreases wear and tear on supportive structures.
Good posture reduces back and neck pain
The proper alignment of your spine allows you to move easily so that your body supports your weight without strain. Poor posture can place stress on your tendons, muscles, and ligaments, leading to neck and back pain.
If you suffer from neck and back pain, it may surprise you to know that improving your posture may go a long way in easing your symptoms.
Poor posture impacts digestion
Slouching puts your body in an unnatural position that can impact certain abdominal organs. Stooping or hunching over at your desk or slouching while looking at your mobile device can interfere with proper digestion, increasing the risk for acid reflux and constipation.
If you notice that you get heartburn when slouching, something as simple as sitting up straight may bring relief.
Good posture improves muscle and joint function
When you use good posture, your muscles and other structures function properly, helping you to avoid abnormal wear and tear. Improper posture places stress on your joints and can cause them to wear away. This is the most common cause of osteoarthritis, a form of “wear and tear” arthritis.
While other factors, such as age and genetics, can increase the risk of arthritis, the way you carry your body plays a role in how much stress you put on your joints. Keeping your body aligned in the proper posture can reduce muscle fatigue and strain and help keep your joints healthy and lubricated.
Proper posture boosts mood
When you think about factors that can improve your mood, posture likely isn’t the first thing to come to mind. Look at it this way: Your brain and body have two-way communication, meaning that your mood can impact your posture and your posture can affect your mood. When you’re happy, you may notice that you sit upright, and when you’re feeling down, you’re more likely to slouch or sit in a slumped position.
The next time you notice your mood sinking, try changing your posture; stand up straight, and take deep breaths. You may notice a gentle boost in mood after doing so.
Standing

Stand up straight and tall
Keep your shoulders back
Pull your stomach in
Put your weight mostly on the balls of your feet
Keep your head level
Let your arms hang down naturally at your sides
Keep your feet about shoulder-width apart
Sitting

Many spend a lot of their time sitting - either at work, at school, or at home. It is important to sit properly, and to take frequent breaks:
Switch sitting positions often
Take brief walks around your office or home
Gently stretch your muscles every so often to help relieve muscle tension
Don't cross your legs; keep your feet on the floor, with your ankles in front of your knees
Make sure that your feet touch the floor, or if that's not possible, use a footrest
Relax your shoulders; they should not be rounded or pulled backwards
Keep your elbows in close to your body. They should be bent between 90 and 120 degrees.
Make sure that your back is fully supported. Use a back pillow or other back support if your chair does not have a backrest that can support your lower back's curve.
Make sure that your thighs and hips are supported. You should have a well-padded seat, and your thighs and hips should be parallel to the floor.

Lifting

Follow these tips to avoid compressing the spinal discs or straining your lower back when you are lifting:
Keep a wide base of support. Your feet should be shoulder-width apart, with one foot slightly ahead of the other (karate stance).
Squat down, bending at the hips and knees only. If needed, put one knee to the floor and your other knee in front of you, bent at a right angle (half kneeling).
Keep good posture. Look straight ahead, and keep your back straight, your chest out, and your shoulders back. This helps keep your upper back straight while having a slight arch in your lower back.
Slowly lift by straightening your hips and knees (not your back). Keep your back straight, and don't twist as you lift.
Hold the load as close to your body as possible, at the level of your belly button.
Use your feet to change direction, taking small steps.
Lead with your hips as you change direction. Keep your shoulders in line with your hips as you move.
Set down your load carefully, squatting with the knees and hips only.
Keep in mind:
Do not attempt to lift by bending forward. Bend your hips and knees to squat down to your load, keep it close to your body, and straighten your legs to lift.
Never lift a heavy object above shoulder level.
Avoid turning or twisting your body while lifting or holding a heavy object.
Walking
Stand up straight. Visualize being tall and straight, like a tree. Do not arch your back.
Do not lean forward or lean back. Leaning puts a strain on the back muscles as you walk, and you should avoid leaning except when on a hill. Unfortunately, some coaches have taught leaning for speedwalking, but it is not necessary, and often people lean too far forward or back.
Keep your eyes forward. Avoid looking down. Your focus should be about 20 feet ahead of you. This way you will be able to see your path and anything coming at you from the sides.
Keep your chin up (parallel to the ground). This reduces strain on your neck and back. A proper chin position will also allow you to look ahead rather than down at your feet.
Let your shoulders be back and relaxed. Shrug once and allow your shoulders to fall and relax, slightly back. Loosening up the shoulders in this way will help relieve tension and put them into a position to use good arm motion while walking. You can also do this at intervals during your walk to ensure you are keeping your shoulders relaxed.
Suck in your stomach. Your core muscles can help you maintain good posture and resist slouching and leaning. Keeping your stomach pulled in slightly (while still taking deep, full breaths) can help you maintain good walking posture.2
Tuck in your behind and rotate your hips forward slightly. This will keep you from arching your back. You shouldn't have your butt sticking out while you're walking.
Sleeping
A good sleeping position along with a good quality of sleep throughout the night relaxes the spine and muscles. Sleep is needed not just for relaxation but also for mental and physical recovery.

About 38% of people tend to sleep on their back, making it the second most common position to sleep in. It is also called a supine position. The spine stays elongated and in a natural healthy position while sleeping on the back.
Individuals with lumbar spinal pain and neck pain may find relief in this position with proper support. They may wake with less stiffness and alleviation of pain.
However, the supine position is contraindicated in people suffering from sleep apnoea. This position leads to airway collapse and tends to worsen the symptoms of obstructive sleep apnoea. It also exacerbates snoring.
While it is a much sought-after and natural position it is not advised for pregnant women and older adults. Sleeping on the back also worsens acidity.

Sleeping on the side is the most common sleep position among adults. About 54% of adults sleep in this position. Its popularity might be because of the inflexibility of the spine as we age. Side sleeping is considered healthy for several reasons because it keeps the spine aligned and relatively neutral. It is even more comfortable for people with lower back pain and neck pain if they support their knees with a blanket in between or a pillow. This helps provide support to the hips and pelvis.
Some individuals find sleeping on their backs uncomfortable and may find relief sleeping on their side. However, they should make sure that the thickness of their pillow is such that it helps keep their neck and spine at the same level.
This position helps individuals with obstructive sleep apnoea as the airways are not as collapsed as when sleeping on the back. People who tend to snore while sleeping may also find relief while sleeping on their side.
Sleeping on the side is also the best position for those suffering from acidity or GERD, especially on the left side. Turning to the left from the back position can instantly provide some relief. Side sleeping on the left is also recommended for pregnant women as the belly puts less pressure on the heart and eases blood flow.
However, the most preferable sleep position might not be the best for individuals suffering from shoulder pain. While sleeping on the side, it should be taken care that the spine is not bent and the fetal position should be avoided. The fetal position is considered to be an unhealthy position as the spine is curved and it may cause undue pain or strain on waking. The fetal position also makes breathing more difficult and puts pressure on the diaphragm.
For General Smartness please refer this

Reference: https://www.news-medical.net/health/A-Guide-to-Healthy-Sleep-Positions.aspx
Smartness and Good Order 1Etiquette
Basic Social Etiquette
There are certain accepted behaviors in all social situations that you need to learn. With few exceptions, putting them into practice can make a big difference in your social life.
Social rules:
Easy to have good manners – These basic rules of proper etiquette are mostly common sense with a healthy dose of the Golden Rule thrown in for good measure.
Be on time – No one likes to wait for others who are chronically late. However, there are times when being late is out of your control.
Personal space – When you see someone squirming as you step closer back off a bit. Every culture has different comfort levels of personal space, so before you travel, find out how close you can get to people without being rude.
Men’s manners – This one is simple: All you have to do is be a gentleman. Rudeness is never manly.
Women’s manners – You can be a lady and still show strength. Times have changed, and some rules have become outdated, but it's always appropriate to be mannerly.
Teens’ manners – Show everyone how grown up you are by demonstrating good manners. Chances are, if you exhibit proper etiquette, you'll earn respect and maybe even more privileges.
Children’s manners – Be the kid everyone wants to play with. Even grownups will want to be around you if you're polite.
Host and Hostess Gift - Never show up empty-handed when you're a guest in someone's home.
Dealing with a Flaky Friend - It's difficult to deal with someone who is always late, forgets to show up, or can't be relied on.
Communication

Regardless of who you are, you’ll have the need to communicate throughout life. Being a good communicator can do a variety of things for you, including sharing important information, winning people to your side, and raising your children.
Learning to communicate:
Conversation – Learn how to hold a decent conversation, with back-and-forth dialogue. Never monopolize a discussion, or you may find yourself stuck in a corner trying to figure out why others are walking a wide berth around you.
Gossip – Never gossip. Not only is it bad form, if word ever got back to the person you were talking about, you can pretty much be assured you’ll be the subject of the next gossip session.
People’s names – Everyone has one, and most people appreciate your effort to learn their names if you spend more than a minute or two talking with them. This applies to social and business contacts.
Cell phones – In a nutshell, use your cell phone sparingly in public. No one else wants to listen in on a private conversation or wait while you text someone the latest Internet joke. And whatever you do, ignore your phone while you're checking out at the cash register. Texting or chatting on the phone is rude to the cashier and the people behind you.
Email – Think before you hit “send.” Most electronic mail can never be taken back.
Social media – Facebook, Twitter, and other social media are part of most people’s lives. Remember that not only can your friends see what you post, others can repost, copy, share, or retweet anything you put out there.
Rude questions – We have all gotten them. There are ways to deal with them and not come across as snarky. If you're not sure how to answer a rude question, don't say anything. Just smile and change the subject.
How to Graciously Change the Subject - There are times certain things shouldn't be discussed, and it's up to you to shift the conversation.
Dining
If you share a meal with anyone, learn proper table manners. No one wants to sit across the table from a slob who talks with his mouth open or snorts milk through his nose.
Learn proper table manners:
Basic table manners – Follow the basics that apply to almost every dining situation. If having your elbows on the table makes it rock, take them off the table. Put your napkin in your lap, use the flatware starting with the one farthest from the plate, and don't talk with your mouth full.
Restaurant manners – Learn all about how to conduct yourself when dining out. Arrive before your scheduled reservation, be polite to your server, keep your voice at a conversational level, and be a generous tipper.
Formal dinner party – Know how to act at a formal dinner party, including which utensils to use for each course. If you're ever in doubt about which fork goes with each course, look to the host or hostess and follow them.
Social Health 1
Make a poster on prevention of drug abuse/ make a speech of 5 minutes on anti-Drug abuse/write an essay of about 200 words on anti-drug abuse/write a poem of about 4 verses on anti-drug abuse/ do a short sketch or drama on anti-drug abuse. Do one of them

Risk of drug use increases greatly during times of transition. For an adult, a divorce or loss of a job may increase the risk of drug use. For a teenager, risky times include moving, family divorce, or changing schools. When children advance from elementary through middle school, they face new and challenging social, family, and academic situations. Often during this period, children are exposed to substances such as cigarettes and alcohol for the first time. When they enter high school, teens may encounter greater availability of drugs, drug use by older teens, and social activities where drugs are used. When individuals leave high school and live more independently, either in college or as an employed adult, they may find themselves exposed to drug use while separated from the protective structure provided by family and school.
A certain amount of risk-taking is a normal part of adolescent development. The desire to try new things and become more independent is healthy, but it may also increase teens’ tendencies to experiment with drugs. The parts of the brain that control judgment and decision-making do not fully develop until people are in their early or mid-20s. This limits a teen’s ability to accurately assess the risks of drug experimentation and makes young people more vulnerable to peer pressure.
Because the brain is still developing, using drugs at this age has more potential to disrupt brain function in areas critical to motivation, memory, learning, judgment, and behavior control.

Avoidance is Addiction’s Best Friend
Common risk factors for teen drug abuse include:
A family history of substance abuse
A mental or behavioral health condition, such as depression, anxiety or attention-deficit/hyperactivity disorder (ADHD)
Impulsive or risk-taking behavior
A history of traumatic events, such as experiencing a car accident or being a victim of abuse
Low self-esteem or feelings of social rejection
Consequences of teen drug abuse
Negative consequences of teen drug abuse might include:
Drug dependence. Teens who misuse drugs are at increased risk of serious drug use later in life.
Poor judgment. Teenage drug use is associated with poor judgment in social and personal interactions.
Sexual activity. Drug use is associated with high-risk sexual activity, unsafe sex and unplanned pregnancy.
Mental health disorders. Drug use can complicate or increase the risk of mental health disorders, such as depression and anxiety.
Impaired driving. Driving under the influence of any drug can impair a driver's motor skills, putting the driver, passengers and others on the road at risk.
Changes in school performance. Substance use can result in a decline in academic performance.
Health effects of drugs

Drug use can result in drug addiction, serious impairment, illness and death. Health risks of commonly used drugs include the following:
Cocaine — Risk of heart attack, stroke and seizures
Ecstasy — Risk of liver failure and heart failure
Inhalants — Risk of damage to heart, lungs, liver and kidneys from long-term use
Marijuana — Risk of impairment in memory, learning, problem solving and concentration; risk of psychosis — such as schizophrenia, hallucination or paranoia — later in life associated with early and frequent use
Methamphetamine — Risk of psychotic behaviors from long-term use or high doses
Opioids — Risk of respiratory distress or death from overdose
Electronic cigarettes (vaping) — Exposure to harmful substances similar to exposure from cigarette smoking; risk of nicotine dependence
Seeking help for teen drug abuse
Steps if you have a friend or a relative seeking for drugs:
Talk to him or her. You can never intervene too early. Casual drug use can turn into excessive use or addiction and cause accidents, legal trouble and health problems.
Encourage honesty. Speak calmly and express that you are coming from a place of concern. Share specific details to back up your suspicion. Verify any claims he or she makes.
Focus on the behavior, not the person. Emphasize that drug use is dangerous but that doesn't mean your friend/relative is a bad person.
Get professional help. If you think your friend/relative is involved in significant drug use, contact a doctor, counselor or other health care provider for help.

Preparation for Flag Break/Hoisting
Civic duty is an important part of Scouting. The Troop flag is a symbol of our Scout Group. The flag represents us as a team. Working with Scouts and showing respect to a flag, whether it’s saying the pledge, presenting a flag at a ceremony or parade, or learning to properly retire an old, tattered flag, is how we help Scouts develop pride in their country.

Flag ceremonies may be used for:
Opening or closing meetings
Opening or closing special events
Beginning or closing a day
Honoring a special occasion or special person
Retiring a worn flag
Flag ceremonies may take place in:
Meeting rooms
Outdoor settings
Large auditoriums
Onstage
Order of the Opening Ceremony
Calling for Horse-shoe formation (Whistle call : All Scouts)
Flag Break (Other than the National Flag)
Scout Salute
National Anthem
Religious observances
Thought of the Day
Marking the Attendance
Notices, Programme lineup
Break off (for the rest of the activities)
Order of the Closing Ceremony
Calling for Horse-shoe formation (Whistle call : All Scouts)
Notices, Points for the day, Awarding of badges
Flag Lowering while singing Evening Taps
Duty Hand-over
Dismiss (Patrol Order)
Evening Taps
Day is done, gone the sun, From the seas, from the hills, from the sky; All is well, safely rest, God is nigh.
Know the Area around 1
Know the area within a radius of ½ K.M. from your home, and have a knowledge of important places within that area
If you have ever considered making a change and moving to a new city or state (or perhaps country even), you have probably, at some point, considered a variety of factors to determine where best to move. There are a lot of factors about where you live that can affect your quality of life and your happiness. Thus, moving to a new location is not a decision that should be made lightly.
It is the same when you are living, everyone should know the area around them. Below are some of the most important points why you should know the area around and why it is so important.
FRIENDSHIP & SUPPORT
Getting to know your neighbours is the first thing you should do, this widen the range of benefits including enhanced safety and community events. Whether you need to borrow a tool or need help with a household work, a good neighbour is always there to help. In both challenging and joyous times, these relationships remind you that you're surrounded by friendship and support.
EMERGENCY SERVICES
How far away are you from an emergency room or a fire department? It’s good to be aware of these things before an emergency actually strikes, and in some suburbs, the nearest hospital or police station can be surprisingly far away.
It is advisable to know about the emergency services near your house or in your area for your needs in case of an emergency. Saving down the contact numbers of your nearby Emergency Services is a vise choice. Eg: In case of a robbery you can contact emergency hotline 119 or the closest Police Station directly if you have the contact number saved.
RETAIL NECESSITIES
It is advisable to have a good knowledge on the retail stores in the area, and near your house.
What shop/shops got the best quality dry rations
What shop/shops got the freshest meat/vegetables
Who offers discounts
What shop/shops open early in the morning and available till late at night
RELEGIOUS ACTIVITIES
Religious places have different levels of significance for different people and they play a very important role in the society. On a very basic level it is a social network for people of similar spiritual beliefs or spiritual goals to get together and keep their motivation going. Some people, these places are to reflect upon themselves in a peaceful manner as, in general, religious places are filled with peace and positivity. It is most advisable that you visit your neighborhood religious place and keep in touch with them.
NEEDS
According your needs the places you need differ, but in general having an overall understanding about your area is useful and can come in handy.
What you need to list down and How
Best reference is that you refer to Google Maps, please note that some places might not be in Google Maps but you add it it your map.
Measure the 1KM from your house (You can use the vehicle Odometer: Mileage reader to measure the distance very easily) and prepare your map accordingly to the scale of 1KM radius.
The Map should be drawn like this with the Map Legend. Center your house and draw a house to show your house.

What do you need to list down/add to your map
Your house : 🏠
Police Station, Post Office, Sub-Post Office
School
Hospital
Temple, Church, Kovil, Mosque
Playground, Park
Gas Station, Hotels (Main)
Famous/Important milestones, places
Cemetery
The above image is only for reference and should not be reproduced. Refrain from using Google Map Image as the reference Image. Use your own drawing skills to draw.
Outdoor Activity
Actively take part, in two of the under mentioned activities
Hike (of about 500 meters organized by the Patrol)
Obstacle Course
Treasure Hunt
Nature ramble
Bird Watching
Exploring places of archeological value or any other such activity. Please make sure that log entries of these are entered in the personal Log Book

Outdoor activities are an integral part of the Scout experience, promoting teamwork, leadership, and a connection with nature. Here are some outdoor activities that Scouts can enjoy:
Camping: Organize camping trips to explore nature, learn outdoor skills, and build camaraderie among Scouts.
Hiking: Go on hiking adventures to discover local trails, national parks, or scenic areas while staying physically active.
Orienteering: Learn orienteering skills and participate in treasure hunts or map-based challenges.
Cooking Outdoors: Have fun cooking meals over a campfire or using portable stoves, teaching Scouts valuable cooking skills.
Canoeing/Kayaking: Plan water-based adventures on lakes or rivers for an exciting experience on the water.
Fishing: Introduce Scouts to fishing and teach them about responsible angling and aquatic ecosystems.
Outdoor Games: Play team-building games, capture the flag, or other fun outdoor activities.
Nature Walks: Take leisurely walks to observe wildlife, plants, and ecosystems, promoting environmental awareness.
Stargazing: Learn about constellations and the night sky during stargazing sessions.
Service Projects: Organize outdoor conservation projects like tree planting, trail maintenance, or beach clean-ups to give back to the community.
Geocaching: Combine technology with outdoor exploration through geocaching, using GPS to find hidden containers.
Fire Building: Teach Scouts how to build and safely manage campfires, a fundamental outdoor skill.
Outdoor Cooking Competitions: Host friendly cooking competitions where Scouts prepare creative dishes using campfire or portable stoves.
Survival Skills Training: Provide lessons on basic survival skills, such as building shelters and finding food and water in the wild.
Water Activities: Participate in water-based activities like swimming, rafting, or paddleboarding (if available and properly supervised).
Outdoor Scavenger Hunts: Organize scavenger hunts to explore the surroundings and enhance observational skills.
Nature Crafts: Create art and crafts using natural materials found in the outdoors.
Rock Climbing: For older Scouts, consider rock climbing or bouldering with proper safety equipment and supervision.
Remember to prioritize safety during outdoor activities, and always adhere to relevant regulations and guidelines. Each activity should also be adapted to the Scouts' age, skill level, and environmental conditions. Outdoor adventures not only create memorable experiences but also instill values of responsibility, self-sufficiency, and respect for nature in Scouts.
More Activities
Camping
Hiking
Orienteering
Cooking Outdoors
Canoeing/Kayaking
Fishing
Outdoor Games (e.g., Capture the Flag, Tug-of-War)
Nature Walks
Stargazing
Service Projects (e.g., Trail Maintenance, Tree Planting)
Geocaching
Fire Building
Outdoor Cooking Competitions
Survival Skills Training
Water Activities (e.g., Swimming, Rafting)
Outdoor Scavenger Hunts
Nature Crafts
Rock Climbing
Archery
Wildlife Watching
Birdwatching
Plant Identification
Environmental Cleanup
Campfire Stories and Songs
Outdoor Yoga or Meditation
Nighttime Nature Sounds Listening
Outdoor Photography
Outdoor Sketching or Painting
Nature Journaling
Outdoor Astronomy Observation
Tree Climbing
Star Navigation and Map Reading
Shelter Building
First Aid Training in Outdoor Settings
Outdoor Team-Building Games and Initiatives
Ropes Courses or High Ropes Challenges
Outdoor Movie Night
Outdoor Cooking Class
Scouting Olympics (various outdoor challenges)
Water Balloon Fight or Water Games
Sandcastle Building
Outdoor Concert or Musical Performance
Nighttime Flashlight Tag
Outdoor Science Experiments
Outdoor Theater or Skits
Outdoor Dance Party
Treetop Adventures (with proper safety equipment)
Outdoor Environmental Education Program
Outdoor Campfire Cooking (e.g., s'mores, campfire popcorn)
Visit National Parks or Nature Reserves for exploration.
Environment Protection for sustainability
Understand bad effects/impact of using chemical fertiliser pesticides, weedicides, etc.
Collect information about it and make a verbal report to the Scout Leader
Understand the basics of making a compost pit in school or at home
Plant a tree, maintain and protect it. Use the compost made by the Scout for this plant

What is a Pesticide?
A pesticide is any substance or mixture of substances intended for preventing, destroying, repelling or mitigating any pest.
What are Weedicides?
Weeds are unwanted plants growing among wanted crops and compete with crop plants for sunlight, nutrients, water etc. Weedicides are the chemicals which are sprayed over the fields to get rid of weeds.
Pesticides and human health:
Pesticides can cause short-term adverse health effects, called acute effects, as well as chronic adverse effects that can occur months or years after exposure. Examples of acute health effects include stinging eyes, rashes, blisters, blindness, nausea, dizziness, diarrhea and death. Examples of known chronic effects are cancers, birth defects, reproductive harm, neurological and developmental toxicity, immunotoxicity, and disruption of the endocrine system.
Some people are more vulnerable than others to pesticide impacts. For example, infants and young children are known to be more susceptible than adults to the toxic effects of pesticides. Farm workers and pesticide applicators are also more vulnerable because they receive greater exposures.
For more information about the effects of specific chemicals or pesticide products, see Pesticide Action Network’s Pesticide Database. For a survey of scientific studies linking pesticides to specific diseases, see Beyond Pesticides’ Pesticide-induced diseases database.
Acute (Immediate) Health Effects
Immediate health effects from pesticide exposure includes irritation of the nose, throat, and skin causing burning, stinging and itching as well as rashes and blisters. Nausea, dizziness and diarrhea are also common. People with asthma may have very severe reactions to some pesticides, particularly pyrethrin/pyrethroid, organophosphate and carbamate pesticides.

In many cases, symptoms of pesticide poisoning mimic symptoms of colds or the flu. Since pesticide-related illnesses appear similar or identical to other illnesses, pesticide poisonings are often misdiagnosed and under-reported. Immediate symptoms may not be severe enough to prompt an individual to seek medical attention, or a doctor might not even think to ask about pesticide exposure. Still, seek medical attention immediately if you think you may have been poisoned by pesticides.
Chronic (Long-term) Health Effects
Chronic health effects include cancer and other tumors; brain and nervous system damage; birth defects; infertility and other reproductive problems; and damage to the liver, kidneys, lungs and other body organs. Chronic effects may not appear for weeks, months or even years after exposure, making it difficult to link health impacts to pesticides.
Pesticides have been implicated in human studies of leukemia, lymphoma and cancers of the brain, breasts, prostate, testis and ovaries. Reproductive harm from pesticides includes birth defects, still birth, spontaneous abortion, sterility and infertility.
Endocrine disruptors are chemicals that — often at extremely low doses — interfere with important bodily functions by mimicking or blocking hormones (the chemical messengers that circulate in blood and regulate many body processes including metabolism, brain development, the sleep cycle and stress response). Some pesticides act as endocrine disruptors and have been shown to cause serious harm to animals, including cancer, sterility and developmental problems. Similar impacts have been associated with human exposure to these chemicals.
Children are More Vulnerable to Pesticide Exposure
Children are not simply “little adults.” Children are more vulnerable to pesticides exposure because their organs, nervous systems and immune systems are still developing; their higher rates of cell division and lower body weight also increase children’s susceptibility to pesticide exposure and risks. Their immature organs and other developing biological systems are particularly vulnerable to toxic contaminants. Exposure during certain early development periods can cause permanent damage.
In addition to being more vulnerable to pesticide toxicity, children’s behavior and physiology make them more likely to receive greater pesticide exposure than adults. Most pesticide exposure occurs through the skin and children have more skin surface for their size than adults. Children have a higher respiratory rate and so inhale airborne pesticides at a faster rate than adults. Children also consume proportionately more food and water — and pesticide residues — than adults. With their increased contact with floors, lawns and playgrounds, children’s behavior also increases their exposure to pesticides.
Effects of Weedicides on the ecology of a place
Weedicides effect the ecology of a place to a great extent in the following ways:
They generally have negative impacts on bird populations, although the impacts are highly variable.
Frog populations may be affected negatively by the use of weedicides as well.
Long term exposure of weedicides are responsible for various types of cancers.
Here is an article on exposure of Pesticide in Sri Lanka
Safe from Harm 8
Be able to help a younger scout contact his/her parents
Know the Emergency Ambulance number and the Emergency Police number
Know the safety concerns of day to day safe living: Some examples -
Climb a Wall or a Fence
Playing with Fire
Sharp Objects
Playing from heights
Safe behaviour with swimming pools, streams and rivers
How to protect ourselves from mosquitoes, snakes and stray dogs
Know the different areas of Safety (sexual, physical, psychological, emotional, Internet and telephone etc.) be able to give examples for each
Be able to explain to the Patrol the methods of reporting in case of abuse or harassment to himself / herself or to somebody else.
Know what to do if you get lost
At Camps

Follow the Buddy system (Buddy System : Accompany another Scout) at all times in the Camp grounds
Avoid camping at high uneven grounds, muddy grounds and near river banks unless it is guided by an experience Scout Master or a Camper
Follow the Camp Guidelines
Inform your Scout Master or Camp Warden when leaving the Campsite
Avoid getting yourself into unnecessary fights
Avoid river bathing and diving unless it is guided and the safety measures taken
At hikes and excursions / During Job Week

Follow the instructions at all times
Do not use forest routes unless it is instructed to do so
Never accept anyone's offer to help you with a shortcut unless he/she has a proven identification
Follow the Buddy system
Never do risky doings when at hikes and excursions
Do not climb trees without proper technique and safety measures
Use enclosed shoes, sandal pairs with a good grip and avoid using slippers
Always background check on the place/route you will be following
Never get inside of a stranger's vehicle unless you are with a group
Do not eat/drink anything offered to you openly(Toffees, Drinks in a glass), it is advisable for you to accept closed branded packets (Biscuit packets, Packed Buns etc)
At School

Follow School guidelines
Never go home with anybody other than your father/mother/or the person who takes you home usually. Not even if that person says that your father/mother has specifically asked you to go with him/her. You will go with that person, only if your father or mother has specifically told YOU to go with him/her.
Never be in school for long hours after school without a purpose
Do not climb over the School Walls
Obey the Staff
At Home/At a place of a friend or relative
Avoid doing electrical work or any kind of risky work (Changing a light bulb) without a parent supervising
Avoid handling knifes and sharp tools/objects when you are alone unless you are well experienced
Do not open the door for strangers if you are alone, if so ask them to come back when parents come back
Knots and Lashings 2
Know how to put the following knots and hitch and know when they could be practically used:
Fisherman’s Knot
Man harness Knot
Timber Hitch
Tie Knot
Know the following lashings and know when they could be used practically.
Square Lashing
Diagonal Lashing
Sheer Lashing
Fisherman's Knot

Fisherman’s knot, also known as English knot, consists of two overhand knots each one tied around the standing part of the other one. Though it is mainly used as a bend to join two lines, it can be easily used to connect the ends of a single length of rope to form a loop. The beauty of the knot lies in its symmetry.

Advantages
Compact
Strong
Does not slip under strain
Working ends can be cut very close to the knot without risk of failure
Can be tied even with cold, wet hands
Disadvantages
Can slip when tied in slippery lines such as nylon monofilament
Jams when tightened (However, this is advantageous for fishing purposes). Difficulty in untying makes it differ from the sheet bend.
Uses
Fishing
Knitting.
Scouting.
Net making.
Tying webbing.
Rock climbing and by arborists.
Backing up other less secure knots.
Making macramé jewelry, paracord bracelets and keychains.
In knot-tying ceremonies of weddings to symbolize how bonds grow stronger under strain.
Man Harness Knot (Alphine Butterfly Loop)
It provides a secure loop in the middle of a piece of rope. Load can be safely applied: from the loop to either end of the rope; between the two ends with the loop hanging free; or to the loop with the load spread between the two ends.
Advantages
The Alpine Butterfly Loop is more stable than either the The Bowline on a Bight which may roll over. Even after a heavy load, the Alpine Butterfly Loop remains reasonably easy to undo.
Uses
The Alpine Butterfly Loop is useful anytime a secure loop is required in the middle of a rope. A good example is when a line of hikers wish to hook on along the length of a shared rope.
If a length of rope is damaged, it is a wonderful way to isolate the damaged section so that the rope may still be used – far safer than The Sheep Shank.
Timber Hitch
The Timber Hitch is as much used for handling cargo “… for which it is very convenient, as it practically falls apart when pull ceases."
Uses
The Timber Hitch is useful when towing a spar or log either afloat or on land. When used for this purpose, the Timber Hitch is often placed near the center of the spar and a separate Half Hitch is dropped over the end of the spar to act as a guide.
Fact: Diagonal Lashing is started using Timber Hitch
Four-in-Hand Necktie
Advantages
Simplicity and speed – which is why so many parents teach their children to tie the Four-in-Hand Necktie knot. Also, when the short end is pulled out, the knot does not require untying, it just falls apart.
Square Lashing

Square Lashing is the most common lashing in Scouting. The Square Lashing is used to bind two poles together. The lashing is designed to be load bearing and can be used to create scaffolding. Although the two poles usually cross each other at 90 degrees, the Square Lashing may be used when the angle between the two poles is as little as 45 degrees.
Frapping Turns: The turns surrounding the lashing at right angles exert a tightening effect on the lashing. These turns are known as Frapping Turns. Pulling them as tight as possible makes the Lashing more secure. Various techniques are recommended but I’m indebted to Dana Holgate for the following. Make use of your leg-strength. Wrap the rope around a stick. Stand on the poles being lashed with your knees bent, hold the stick across your thighs, and then straighten your legs to tighten the lashing.
Diagonal Lashing

The Diagonal Lashing is used to lash two spars together. Unlike the Square lashing which works for right angle crossings, the diagonal lashing secures poles crossing each other at a variety of angles.
Frapping Turns: The turns surrounding the Diagonal Lashing Knot at right angles exert a tightening effect on the lashing. These turns are known as Frapping Turns. Pulling them as tight as possible makes the Lashing more secure.
The Diagonal Lashing Knot is used to join two diagonal poles that are being used to brace a rectangular frame. The location of one diagonal in front and one behind explains the gap between the poles commonly found in the center.
Sheer Lashing
The Shear Lashing Knot is used to lash the ends of two poles together. The other ends are separated to make a pair of Shear Legs.
Spelling: The Sheer Lashing Knot is widely spelled both “Shear” and “Sheer”. There seems to be little agreement and some writers use both on the same page.
Sheer legs support weight. A single pair can be controlled with a rope as they lean over a stream to lift a bucket. A series of them can support an aerial walkway.
Frapping Turns: The turns surrounding the lashing at right angles exert a tightening effect on the Shear Lashing Knot. These turns are known as Frapping Turns. Pulling them as tight as possible makes the Lashing more secure.
Pioneering Work 1
Show the ability to make a Trestle and a Portable flag mast, using staves.
Trestle


Portable Flag mast
H-Base
Parts of the rope
You won't need to be told that a piece of rope will have two ends! However, in order to work with ropes, it is useful to be able to refer to different parts. The main parts of a rope are called:
Working end - The end of the rope you are using to tie a knot;
Standing end - The end of the rope opposite to that being used to tie the knot;
Standing part-Any part between the two ends. It can be a part of the rope already used in the knot;
Loop - A loop made by turning the rope back on itself and crossing the standing part;
Bight - A loop made by turning the rope back on itself without crossing the standing part.

Types of Rope
Laid ropes - These are ropes normally consisting of three strands which run over each other from left to right. Traditionally they are made from natural fibres, but nowadays they tend to be made from synthetic materials
Braided ropes - These are ropes which consist of a strong core of synthetic fibres, covered by a plaited or braided sheath. (They are always made from synthetic materials.)
Natural ropes - These are relatively cheap and are made from such natural materials as hemp, sisal, manila and cotton which are easy and pleasant to knot. They have the disadvantage that they have a low point at which they can withstand stress before breaking, and other characteristics can be unpredictable because the natural materials with which they are made may have flaws.
Synthetic ropes - These are relatively expensive but last a long time. They are superior in that they are generally lighter, stronger, less prone to rot, water resistant and better able to withstand difficult and extreme environments
Wire ropes are available but are rarely used in Scouting.

How ropes are measured
Ropes are normally measured by their circumference. For example, a 75mm rope is approximately 25mm in diameter
Compass and Mapping 1
Have a basic knowledge of how a magnetic compass work, and be able to show the basic 16 directions shown in the compass.(i.e. North, NE, NNE…)
Be able to show the ability about the undermentioned: Key elements of the map, Conventional signs of a map
Understand how to use the Global Positioning System (GPS)
Compass

The Compass is a useful tool, especially when combined with the use of a map.
Magnetic compass, in navigation or surveying, an instrument for determining direction on the surface of Earth by means of a magnetic pointer that aligns itself with Earth’s magnetic field. The magnetic compass is the oldest and most familiar type of compass and is used in different forms in aircraft, ships, and land vehicles and by surveyors.
A compass works by detecting the Earth’s natural magnetic fields. The Earth has an iron core that is part liquid and part solid crystal due to gravitational pressure. It is believed that movement in the liquid outer core is what produces the Earth’s magnetic field. Like all magnetic fields the Earth’s magnetic field has two main poles, a north and south pole. These magnetic poles are slightly off from the Earth’s axis rotation which is used as the basis of the geographic poles, but they are close enough that the general directions with adjustments for the polar difference, called a declination, can be used for navigation.

Basic 16 Directions shown in the Compass
There are mainly four points of the compass. All the other points are made by combining these four. Eg: Halfway between north and east is northeast. There are many ways to remember the order of the points. The points start at the top and go around clockwise.
Never Eat Shredded Wheat - NESW

The eight main bearings or directions are:
North: 0 Degrees
East: 90 Degrees
South: 180 Degrees
West: 270 Degrees
North East: 45 Degrees
South East: 135 Degrees
South West: 225 Degrees
North West: 315 Degrees
Mapping
A map is a picture of a given area of what the ground looks like from directly above. When undertaking a journey, we need to be able to find our way around competently, sometimes in unfamiliar territory. It is then that we need to be able to use and read maps. The type of map required will depend upon the journey or destination.
A simple sketch map is maybe all that is required to find a room or building, or it may be a road map which helps you plan long distance routes across a whole country. There are also town maps and Ordnance Survey maps. All maps are drawn to a scale which means that a defined length on the map equates to a real length on the ground, for example one cm = one km.
Parts of a map

Symbols
Map symbols are the signs or diagrams shown on a map to indicate physical features. A list or 'key' of what these symbols mean is given at the same point on or in the map for identification. A number of the more common map symbols are shown below. These will be consistent on all modern O.S. maps but they might vary on other sorts of map, so it will be worth checking that on the map you are using that the symbol means what you think it does!


Participate in our mapping sessions for more information
Compass, Mapping and Hiking Guidebook by Colombo District Training Team
B.P. 6 Exercises
Be able to do the 6 exercises given by B.P. to maintain a healthy body, and have made them as a part of your daily routine.
1st Exercise
For the head : Rub the head and face, firmly over several times with the palms and fingers of both hands. Thumb the muscles of the neck and throat.
2nd Exercise

For the Chest : From upright position bend to the front, arms stretched downwards, with back of the hands together in front of the knees. Breathe out. Raise the hand gradually over the head and lean back as far as possible, drawing a deep breath through the nose as you do. Lower the arms gradually to the sides, breathing out the word “Thanks” through the mouth. Lastly, bend forward again, breathing out the last bit of breath in you, and saying the number of times you have done it in order to keep count.
Repeat The exercise 12 times
3rd Exercise

For the Stomach: Standing upright, send out both arms, fingers extended, straight to the front, then slowly swing round to the right from the hips without moving the feet, and point the right arms as far round behind you as you can, keeping both arms level with, or a little higher than, the shoulders. Then, after a pause, swing slowly round as far as you can to the left. Breathe in when pointing to the left. “Body twisting”.
Breathe out when pointing to the right. Repeat six times, change the breathing to the other side and repeat six times.
4th Exercise

For the Trunk: This is also called the “Cone Exercise”. Standing at “Attention” position, raise both hands, as high as possible over the head, and link fingers. Lean backwards, and then sway the arms very slowly round in the direction of a cone, so that the hands make a wide circle above and around the body, the body turning from the hips, and leaning over one side. Then to the front, then to the other side, and then back.
After completing the circle, start in the opposite direction. Repeat six times both ways. Breathe in when leaning backward and breathe out when leaning forward.
5th Exercise

For Lower Body and Back of Legs: Stand with feet slightly apart, touch your head with both hands and look up into the sky, leaning back as far as you can, and then bend forward and downward till your fingers touch your toes, without bending your knees.
6th Exercise

For Legs, Feet and Toes: Stand in ‘Attention’ position, put the hands on the hips, stand on tip-toe, turn the knees outwards, and bend them slowly down to a squatting position, keeping the heels off the ground the whole time. Then gradually raise the body and come to the first position again.
Repeat this 12 times. Breathe in as body rises and breathe out as the body sinks.
Sense Training - Kim's Game
Observe 24 different items within one minute and be able to remember and write down at least 18 of them by memory within three minutes

This game was taken by B-P from Rudyard Kipling's book for boy's "Kim". This is the story of the orphan son of an Irish soldier in India who grew up among the native boys and was later trained for government intelligence work. The training began by showing Kim a tray of precious stones and gems for a minute's observation, then covering it, and asking Kim how many stones and what kind they were.
At first Kim could remember only a few, but soon, by practice, he was able not only to say exactly how many, but to describe the stones. Then he practiced with other articles, and ultimately was able to glance to see all sorts of details of items that were of value in tracing and dealing with criminals.
In its commonly used form, 24 articles of different kinds -- a key, a pocket knife, a computer disk, a coin, a marble, a comb etc. -- are placed on a table and covered with a cloth. The player steps up to the table, the cloth is removed for exactly one minute; the player looks, endeavoring to remember as many as possible, and the player writes down as many as they can remember.
As with Kim, the purpose of this requirement is to develop the faculty for observation and memory.
Fifteen Common Trees
Be able to identify 15 useful trees (of economic value). Know where they naturally grow, their use, their general shapes, the shapes of the leaves, Botanical names etc. and record in your Log book.
This requirement is currently being updated by the Administration. Please refer to the ones we have updated in the sub section.
Coconut Tree
Banana Tree
"Amba" Mango Tree
Rubber Tree
Papaya Tree
Mahogani Tree
Teak Tree
Bamboo Tree
Jack Tree
Kithul "Palm Syrup" Tree
Sugar Cane
Cinnamon Tree
Anoda Tree
Cashew Tree
The island of Sri Lanka with only a land area of around 65500 sq. kM, is well endowed with the mother Nature's blessings, one can say. The whole island is one mass of land where the plant life is very rich and vibrant with all shades of Green colour leaves. There are around 3500 Flora species in Sri Lanka and about one quarter of that is endemic to Sri Lanka.
The vegetation types of the island mainly varies with the climate and the topography. The rainfall and the temperature are the most important factors of the climatic conditions.
There are four major zones of vegetation types in Sri Lanka.
The Arid Zone has a temperature between 32-36 degrees Celsius. The Rainfall is below 100 mm per year and the Altitude is less than 300 meters. The forest type is referred as Tropical Thorn Scrub.
The Dry Zone has a temperature between 28-32 degrees Celsius. The Rainfall is between 1000-1500 mm per year and the Altitude is less than 500 meters. The forest type is referred as Tropical Dry Mixed Evergreen.
The Intermediate Zone has a temperature between 24-28 degrees Celsius. The Rainfall is between 1250-2000 mm per year and the Altitude is between 500-1500 meters. The forest type is referred as Tropical Moist Evergreen.
The Wet Zone has a temperature between 16-28 degrees Celsius. The Rainfall is above 2000 mm per year and the Altitude range is divided in to three categories.
The vegetation type in the altitude range of between 300-1000 meters is called as Tropical Lowland Wet Evergreen forests.
The vegetation type in the altitude range of between 900-1500 meters is called as Tropical Sub Montane forests.
The vegetation type in the altitude range of above 1500 meters is called as Tropical Upper Montane forests.
Coconut Tree
Coconut Tree

Coconut is also one of Sri Lanka's three major export crops, bringing home a total revenue of US$ 537.52 millions last year. Known for its great versatility, coconut tree is one of the most important trees in Sri Lanka, may the guidelines be economical or cultural. The locals call the coconut tree 'Kapruka', meaning the tree that provides all comforts.Forming the general vegetation that covers the grounds of Sri Lanka, it is hard to notice a sky patch not crowded by the towering majestic figures of coconut trees with a crown of leaves spreading towards the heavens.Sri Lankan lifestyle has been inextricably intertwined with the coconut tree, not just for the milk, water and oil giving nut, but to the leaves to the trunk to the fibrous husk that surrounds the coconut. There is no part of the coconut tree that goes to waste in a Sri Lankan household.

In ancient Sri Lanka, people used coconut milk and scraped coconut extensively in their daily preparation of main dishes, desserts, beverages and medicine. Even today, Sri Lankans hardly pass a few hours without consuming food or drink made with coconut milk. Water inside the young coconut is a favourite thirst quencher among the locals and coconut water has even found its way into modern cocktails and mock tails.Other products like coconut treacle, jaggery and vinegar made out of the sap of the cut coconut flower has been a large part of Sri Lankan lifestyle and is still in use largely in preparation of our favourite desserts, pickles and preserve.

While natural coconut vinegar is widely used as a low glycimic and low-sugar option to wine or cedar vinegar powdered coconut jaggery is being celebrated worldwide as coconut sugar.With a view to catering to the changing trends of the global cuisine, Sri Lankan coconut product manufacturers have developed a range of coconut milk based products including coconut milk powder, coconut milk cream and coconut butter that can be easily mixed into coconut milk to add texture, flavour and thickness to dishes.Coconut oil too has been a part of Sri Lankan life style since time immemorial; we fry and temper our food with it, light oil lamps with it and apply coconut oil on our hair for extra conditioning. Although coconut oil no longer provides us with the only source of illumination, coconut oil lamps are lit in thousands daily across Sri Lanka at Buddhist Temples and Hindu Kovils by devotees seeking enlightenment. Sri Lankan coconut oil manufacturers provide the markets with virgin coconut oil as well as RBD coconut oil to suit the requirements of local and global buyers.The fibre found in the coconut husk belongs to two coir fibre types, namely, bristle fibre (long Fibre) and omatt fibre (short fibre).

A unique traditional technique known as 'Ceylon drum system' is being used to extract bristle fibre, producing long pure fibre, mostly suited for the brush industry. Long pure fibre mainly belongs to two main categories; brown and white fibre, which contributes to 80% and 20% respectively of the world coir fibre demand.Other products made of coconut fibre such as coir twine, brooms & brushes, doormats, geotextiles, rubberized coir products including mattresses and horticulture products. The coco peat, a by-product of the local fibre production process has a great demand in the international market as a natural growing medium for various types of plants.Today, Sri Lanka is one of the largest coir exporters to the world and coir rope & twine manufacturing is a home based industry that is prevalent in the coastal cities of Sri Lanka.Not even the empty coconut shell is discarded at Sri Lankan homes. They too are made into simple spoons with a wooden handle for use at the kitchen or burnt at stove for cooking. Sri Lanka exports active carbon and active carbon solution made out of coconut shells, used for a wide range of uses in households, farms and industries.Weaved Coconut Leaves are used for roofingAlthough not as celebrated as other conventional hardwood found in SrI Lanka, coconut wood is rapidly catching up as a strong alternative to traditional hardwood varieties like teak and ebony. Used to produce kitchen utensils and used as rafters and roofing material, coconut wood is widely used in the production of furniture and ornaments today. Sri Lankan coconut wood and coconut shell suppliers export raw materials to several leading designer houses across USA and Europe.Coconut leaf too is widely used as animal feed and is woven into an eye catching pattern to be used for thatching and to prevent soil erosion. It is also used as firewood while the ekel in the middle of the leaf is used to make the brooms used to sweep the gardens clean.With many a benefit derived from many parts of the coconut tree, it is no wonder coconut tree and its flowers are considered a sign of prosperity in the South Asian region.

Coconut Triangle
The coconut triangle which includes the districts of Kurunegala, Puttlam and Colombo produces 3000 million coconuts annually and out of this 200 million are exported while the balance is consumed locally. The coconut triangle covers 66 percent of the total acreage of the country.

Uses of a Coconut Tree
The Flesh: Food, Milk, and Flour
The Water: A Healthy, Refreshing Drink
The Oil: For Cooking, Skin, and Hair:With medicinal, nutritional and topical uses and benefits, there are in excess of 100 reasons to have coconut oil in some form in the home. Here is a selection of them.Topical Uses of Coconut Oil
Natural skin softener and moisturizer.
Reduces fine lines, puffiness and dark circles under the eyes
Prevents skin infections.
Anti-Wrinkle.
Soothes Sunburn and treats blisters and burns.
Removes makeup.
Improves skin tone, elasticity, and age spots.
Heals itchy skin and stops burning from insect bites including snake bites.
Lessens varicose vein occurrences.
Removes head lice.
Conditions the hair, prevents split-ends and treats dry flaky scalp including dandruff.
Heals nail fungal conditions.
Medicinal Uses of Coconut Oil
Eases acid reflux and gives relief in gallbladder disease.
Stabilizes blood sugar levels and insulin production.
Kills viruses such as flu and infectious diseases.
Protects against cancers in the colon, breasts, and digestive tract.
Protects against intestinal disorders.
Reduces pain and inflammatory conditions such as arthritis.
Strengthens the liver.
Relieves symptoms of Chronic Fatigue Syndrome.
Soothes earaches when combined with olive oil and garlic.
Protects against Alzheimer’s disease.
Improves calcium and magnesium absorption, promoting strong bones.
Helps stabilize female hormones and prevents hot flushes and vaginal dryness during menopause.
The Shells: To Steam Food and Craft With: the outer part of the coconut, these have been used for buffing floors, fuel, for charcoal, as handicrafts, as buttons, as drinking vessels, sponges, musical instruments, theatrical sound effects, burnt to ward off mosquitoes and when ground down, the husk is used in cosmetics as a skin exfoliant.

The Husks: A Natural Scrubber and Craft Material
The Husks: Ropes : this is the fiber on the outside of the husk and is used in ropes, doormats, potting compost, mattress stuffing, brushes, mats, rugs, joint sealer for boats (caulking), and sacks.
Tree Leaves: Thatching
The Sticks: Brooms
The Wood: Fires in Traditional Kitchens and roofing
The Flowers: Medicine
Fun facts
Coconut thatches are widely used because they are so copious and because they are naturally fitting for roofing. They are simple to process and easy to fix to a roof structure. Coconut thatches roofing lasts more than 4 years. They are outstanding for poor friendly homes. Some people tend to change to corrugated iron or other materials as soon as they can afford it and such material are not Eco-friendly. The Coconut thatches are used for roofing either in their natural form. Coconut thatches must be mature and dry before they are used for thatch. For thatching purposes coconut leaves are classified by the way that the leaf blades are attached to the stem.

Banana Tree
Banana Tree

Bananas are the most widely consumed fruits in the world and there are over 29 variaties of bananas in Sri Lanka. It is also an attractive fruit crop for farmers due to its high economic gains throughout the year. Currently, nearly 60,000 hectares of land are under banana cultivation in Sri Lanka, making it the fruit taking up most of the land under fruit cultivation. In addition to being a major staple food for farmers, banana is an important source of income, with excess production sold in local markets.Kurunegala, Ampara and Ratnapura districts together contribute 15 percent of the total banana production in Sri Lanka according to arvey cocted by Department of Census and Statistics.Banana has medicinal properties and is highly nutritious. Its leaves make aromatic eco-friendly plates and food wraps. Its trunk serves a decorative function, especially in ritualistic ceremonies. Its fibres make tough rope and delicate fabrics. And around the banana grove is wrapped a wealth of lore, not least about the origin of this ubiquitous plant.
Banana Leaf

The use of banana leaf in the kitchen is nothing new. Its usage is part of the tradition and culture of many countries. Although the leaves are super versatile, the advances in technology have created alternative materials (e.g. aluminium foil and parchment paper). Believe it or not, nowadays, the banana leaf is often put aside.Leaves are large, flexible, waterproof, and nonstick. Besides that, they are beautiful and always give a nice tropical touch.
How to cook with banana leaf
Although they are not edible, the banana leaves have a very important role in the kitchen. It helps in almost every culinary processes: preparation, service, consumption and even as a packaging.It can be used as:
Wrapping for steaming or baking : The banana leaf can hold the liquids of the food, being the perfect package to cook whatever you want, such as vegetables, fish, and chicken. Although the leaf is not consumed, it has a high antioxidant content, these antioxidants are absorbed by the food along with the aroma of the leaf.
Non-stick layer for grilling : The banana leaf prevents the food to stick on the grill. In addition, the leaf has the wonderful advantage of being porous and to be an alive element, so it adds a nice sweet and smoke flavour, something that the aluminium foil can’t do.
Bowl and boat shapes for baking or grilling : A mixture of the uses mentioned above. In Thailand, we tried Khai-Pam, a grilled omelette on the banana leaf that is amazing. Another example would be the Hor Mok, a steamed fish custard on a banana leaf bowl.
Non-stick paper for baking cakes and bread : This is how Bibingka is made in the Philippines. Bibingka is a rice and coconut cake that is baked in a cake pan covered with banana leaves. How about baking a loaf of bread on the banana leaf?
Takeaway or to-go packaging : Have you ever dreamed to find a biodegradable and inexpensive takeaway package? Banana leaves can be the solution to that. In Sri Lanka many people sell food parcels in a triangular package made with banana leaf. Just open it and eat the food on the leaf itself.
Wrapper for food fermentation : For some foods, banana leaves are also a great element for aerobic fermentation,.It allows air exchange while protects the food and lets the fermentation to occur naturally.
A layer for covering plates : In Indonesia, it is very common for dishes to be served with a banana leaf mat on the plate. In this case, the banana leaf has two functions, besides being beautiful, does not let the plates get too dirty. It also contributes to consuming less water for the cleaning! By the way, some local and traditional restaurants called warung makan, use rattan baskets layered with a banana leaf to serve food instead of a regular plate.
They can also be the plate itself or even the tablecloth : In South India, there is a festive tradition called Sadhya where a whole feast is served on the banana leaf stretched on the floor. In this tradition, each portion such as rice, dhal, chutneys and curries have their own specific spot on the leaf.
To wrap the leftover food : If it is used to cook, serve, and pack… why not store? The banana leaf lasts a long time in the refrigerator and freezes very well.

Variaties of Banana
Ambul bananas are famous for being slightly sour but beautifully sweet at the same time. They are petite and slender, sharp-ended, and easy to spot in a crowd. Their skin is relatively thin, covering pale yellow smooshy-soft deliciousness. Best of all, they give out that pungent aroma we all love. According to Sri Lankan tradition, the ambul banana is said to help food move through the digestive tract, and is also considered to be “cooling.” It is therefore not recommended for when you have a cold or a chesty cough.

Seeni bananas are similar to ambul in that they too are small in size. However, they are rounder in shape, and taste distinctly sweeter. The flesh of a seeni banana is sticky-sweet. Its skin is thin, rubbery, apple-green in colour when unripe, and buff-yellow when ripe. These bananas are nutrient-rich and, according to Sri Lankan tradition, recommended for the sick, the elderly, and the very young. It is also believed that these bananas are beneficial to those suffering from diabetes and other “sugar” related problems (although the medical and/or scientific accuracy of this belief is yet to be established).

While the kolikuttu group of bananas are the stout, plump, blunt-ended cousins of the banana varieties described above, kolikuttu and suwendel bananas are the most highly prized dessert banana varieties in Sri Lanka. Kolikuttus are the choice for offerings and religious festivals. They have a thinner skin, which splits during early ripening, and their creamy-white flesh gives out an appetizing aroma. While they are very much in demand, ripe kolikuttu bananas drop readily from their bunch, making it difficult to transport them. According to local beliefs, kolikuttu bananas are “heaty,” and are bring about constipation. Their counterparts, suwendel, are almost apple scented, and their skin is mustard-yellow in colour, when ripe.

The puwalu banana is a slightly less common dessert variety, which takes a curved shape, and whose skin is yellow-tinged brown in colour, when ripe. Its flesh is straw-yellow. Its very attractive counterpart, rath kehel, is famous for its red pigmented skin. The rath kehel is truly a banana of colour, as it’s skin is apple-green when unripe, and turns buff-yellow, and then red, developing brown-black markings, when ripe. Its flesh is sea-foam yellow, and hides within it its minute seeds. It is not terribly sweet, but is certainly softer and sweeter than some banana varieties. Some would, in fact, say it is slightly raspberry-esque in flavour. Interestingly, the red pigment implied in its name only occurs in its vegetative parts (such as its skin) and not in its flesh. Rath kehel is commonly cultivated in Kandy.

Anamalu is a local favourite and belongs to the Cavendish group. It is easily distinguished by its slender, long, curved, shape. Its skin, when ripe, is lemon-yellow, and relatively thick. Its flesh is soft, ivory coloured and sour-sweet on the tongue. It is well loved by athletes in Sri Lanka, for its ability to generate a quick burst of energy. It is also of particular use to those suffering from digestive problems. It is said that over-ripe anamalu can help stop diarrhea, while under-ripe anamalu can help ease constipation. Medicinal qualities aside, anamalu is simply one of those great varieties of bananas you have to love if you are Sri Lankan.

The Ambun is a dessert variety of excellent quality, again, belonging to the Cavendish group, and therefore rather large in size. It was introduced by the Department of Agriculture in 1927, from Serdang, Selangor, in Malaysia. It is curved (though slightly less curved than the anamalu) and its skin is relatively thick. Although its skin is light green when unripe, it turns buff-yellow at full ripeness. Its flesh is maize-yellow.

The nethrapalam however wins, in this group of bananas, for its tremendous stature. Each nethrapalam banana could be up to 12 inches long, and weigh between two to four pounds! While the nethrapalam is certainly less common, it is by far the easiest to recognise, and the hardest to consume on your own (in one sitting!).

Rath kehel, The unripe bananas are initially reddish brown-greenish. The skin is smooth and turns pink to reddish when ripe. This banana reaches up to 5cm in diameter and 15cm in length and is therefore larger than all known apple bananas. (“Banana Sini” and “Banana Ambul”) A banana can weigh up to 200g in weight. There are of course smaller fruits, but in general the red bananas are quite thick.

Ash Plantain "Alu Kehel", Used in cooking variety. They are small and slightly curved with dark green colour and thick skin. They called Ash plantain due to their colour, misty outside like ash on the skin. When they coked they are delicious with a creamy texture and is known for benefits for digestive health. I didn’t consume much of this because it requires frying and was difficult with my Whole-food plant-based, no oil lifestyle.

Unusual treat: Kesel bode (Banana Stem)

Kesel bode (banana pith) curry is highly recommended by indigenous medicine practitioners for its cooling effects. Alu kesel (ash plantain) pith, the core of the trunk, is the preferred choice, and usually available in private gardens soon after the fruit is harvested. As the tree then dies, it is felled and the pith, usually the section in the lower half of the trunk, from centre to ground level, is cooked into a delicious curry. Preparation: Pare the pith until it is about one to an inch and a half in diameter. Prepare a bowl of diluted coconut milk seasoned with salt and tumeric. Finely shred the pith, which discolours quickly when exposed. Add it to the milk. Add in the other ingredients, which should have been prepared in advance: dry mung fried and ground, small thin pieces of potato, unroasted curry powder, dill seeds, sliced green chillies, sliced shallots, sliced garlic, curry leaves, a stick of cinnamon. Mix and bring to a boil on medium heat. Then add thick coconut milk, increase heat and leave to simmer for a few minutes. Goes well with rice, thosai or rotti.(Recipe courtesy of Chitra Surasena)

Banana Flower "Kehel Mala"

Banana FlowerGrows at the end of a banana fruit cluster and has an intense purple colour with the shape of a tear. The cooked banana flower reminds of the taste of artichokes but cooking it with spices gives it its own identity due to heat and sharpness. It’s also common to find this in pickled form in Sri Lanka.
Banana for Decoration
"Gok kola" or early stage of the Coconut leafs are atken for decorating, especially in traditional weddings, religious ceremonies and other national ceremonies.

You could see the traiditonal oil lamp is made with gok kola, but most of the time Banana trunk is taken to support the structure. Banana trunk is the underlaying structure for most of the gok decorations

Banana Fiber "Kesel Patta"

Long pieces are torn from the trunkDo you ever need rope or twine to stake plants or to tie something together but find that you don’t have any to use? If you grow bananas or plantain, then there’s an easy way to make some cord that won’t cost any money. You can use the stringy fibres from banana plants to make your own rope—rope that’s very strong and has many uses.
To get the fibres from the banana tree for making rope, it’s best to wait until after the fruit is harvested, then cut the stem into log-shaped pieces. The length of these log-shaped pieces should be the same length you want for your rope.
Now you have your lengths of banana stem cut into pieces like logs. The next step is to peel the leaf sections off the stem, one by one. Depending on the thickness of the tree, you may get up to 20 leaf sections from one log.
After you have separated all the leaf sections from the banana stems, spread them in the sun to dry. You should do this as soon as possible to prevent insects from getting into the leaf sections and damaging them. Leave the sections in the sun for about a day, or until you can see that they are well-dried. If the leaf sections get too dry and are brittle when you want to use them, you can simply wet them to soften them up.
You are now ready to split them into several narrower sections. The width of the narrow sections will depend upon how strong you want the rope or cord to be. You can use your fingers or a knife to tear off strips the size you want. They could be 3 or 4 cm (1 or 2 inches) wide, or wider or narrower. It really depends on how thick and strong you need the rope to be. You might be using these strips as they are, or you might twist or braid several of them together for greater strength.

Banana Benefits
Bananas are a time-tested source of good nutrition. While we have outlined a number of “traditionally held” benefits of banana-eating, specific to the particular varieties grown in Sri Lanka, A few such benefits, not limited to any particular variety of banana, are set out below for your enjoyment:
Being rich in potassium, bananas are nature’s very own energy bars. They also help protect against muscle cramps during workouts.
The potassium in bananas helps control blood pressure, and protects against strokes.
Bananas improve vision and prevent age-related muscular degeneration.
Bananas build better bones. They are a rich source of probiotics, which nourish the good bacteria that produce vitamins and digestive enzymes in the colon, causing an increased absorption of many minerals, including calcium, which strengthens bones.
Bananas are rich in antioxidants and this may reduce the incidence of cancer in the kidneys.
Bananas help ease symptoms related to stomach ulcers.
The fibre, potassium, vitamin C and B6 content in bananas all support heart health.
Bananas contain tryptophan, an amino acid that, studies suggest, plays a role in preserving memory and boosting mood.
Banana trunks and banana skins are used to make rich compost fertilizer and liquid fertilizer
Fun Banana Facts:
On a lighter note, we also stumbled upon a wealth of great banana-related fun facts. Here is our pick of the best of them:
The inside of a banana skin can be used to calm an itchy mosquito bite.
The kochchikehel variety of bananas found in Sri Lanka is reputed to be an aphrodisiac.
The inside of a banana skin can be used to polish your shoes or your leather handbag.
Bananas are naturally radioactive due to their high potassium content.
Over 100 billion bananas are consumed annually in the world!
Polish shoes with Banana peel
"Amba" Mango Tre

King of the fruits,” mango fruit is one of the most popular, nutritionally rich fruits with unique flavor, fragrance, taste, and heath promoting qualities, making it numero-uno among new functional foods, often labeled as “super fruits.” Mango is one of the delicious seasonal fruits grown in the tropics. A mango is a stone fruit produced from numerous species of tropical tree. The energy value per 100 g (3.5 oz.) serving of the common mango is 250 kJ (60 kcal), and that of the apple mango is slightly higher (330 kJ (79 kcal) per 100 g). Fresh mango contains a variety of nutrients, but only vitamin C and folate are in significant amounts of the Daily Value as 44% and 11%, respectively. Mango trees require full sunlight to fruit well. It will grow in lesser light but not fruit well or may not fruit at all.

Mango, Mangifera indica, is an evergreen tree in the family Anacardiaceae grown for its edible fruit. The mango tree is erect and branching with a thick trunk and broad, rounded canopy. The leaves of the tree are are shiny and dark green. They are either elliptical or lanceolate with long petioles and a leathery texture. The tree produces dense clusters of flowers with cream-pink petals on branched panicles. The mango fruit is roughly oval in shape, with uneven sides. The fruit is a drupe, with an outer flesh surrounding a stone. The flesh is soft and bright yellow-orange in color. The skin of the fruit is yellow-green to red. Mango trees can grow to a height of 45 m (148 ft) and can live for in excess of 100 years.
Uses
Riped fruit is eaten as a fruit, to make jam, juices and ice cream
Unripe mango is used in making a food called “Achcharu”: In making the “Achcharu” the raw mango is cut in to pieces and chopped, and mixed with chili powder, sugar, salt and lime.
The roots and bark are uses for astringent, acrid, refrigerant, styptic, antisyphi.litic, vulnerary, antiemetic, anti-inflammatoxy and constipating medicine.
For Wood
For religious festivals the mango leaves are used
The ash of the burnt leaves are useful in burns and scalds
Source
Varieties of Mangoes
There are over 20 varieties of mangoes in Sri Lanka
Karutha Colombun : This mango reigns high among our mangoes owing to the sweet, juicy, ripened taste it holds as well as its considerable size. It is the most popular mango cultivar in Jaffna and is also known as the Jaffna mango. Moreover we know its presence in the form of ice cream in our country and it is favored by many Lankan palettes.

Willard

Gira Amba
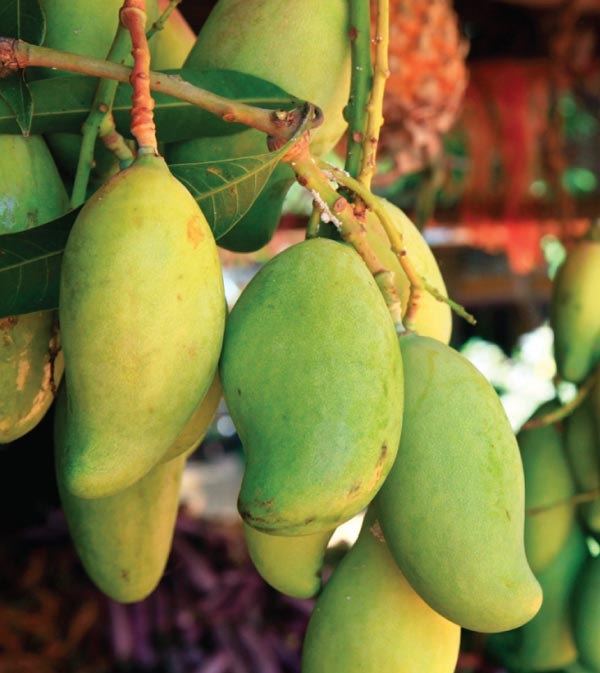
Mee Amba

Pol Amba (Bigger than tha usual amba)
Beti Amba (Smaller than the usual amba)
Alponsu Amba (Grafter Mangoes)
Rubber Tree

During the period of transition from coffee to tea, experiments in a new product, rubber, were being carried out. These experiments proved that various types of rubber yielding trees would flourish in Sri Lanka. However, the industry can be said to have had its birth in 1876 when 1,919 plants of Hevea Braziliensis – the native rubber tree of the Amazon Valley – were received in good condition at the Heneratgoda Botanical Gardens from Kew. It is from these mother trees that the gigantic rubber plantation industry in the Eastern hemisphere sprang. Of the trees planted at the Heneratgoda Botanical Gardens in 1876, the first one flowered in 1881, on which the first experiments in tapping were commenced.
The rubber plantation was thinned out in 1882 and from the 260 seedlings raised the following year and distributed in Sri Lanka, the first spread of commercial rubber planting began. The trees at Heneratgoda were thinned out periodically and by 1887 there were 457 good trees standing which provided the seed for further plantings. In 1890 the Forest Department opened a plantation at Edangoda and by 1893 some 90,000 seeds were distributed for planting and similar numbers were sold in succeeding years.
Currently, about 300,000 acres of rubber is under cultivation with an approximate production of 129 Million Kilograms per year. Sri Lankan rubber plantations produce high-quality natural latex processed products, primarily constituting of Sheet Rubber, Crepe Rubber, and TSR (Technically Specified Rubber).
Sheet Rubber

Sheet rubber is one of the oldest but still most popular types. There are two main types of sheet rubber – Ribbed Smoked Sheets (RSS) and Air Dried Sheets (ADS). The ribbed smoked sheet is more sought after and available for volume consumption. Ribbed Smoked Sheets consists of coagulated rubber sheets, dried using smoke. RSS sheets are graded according to its color, consistency, and observed impurities.

Crepe Rubber

Crepe rubber is made using a process of coagulation that creates a crinkled rubber texture. The process involves combing coagulated latex with some natural form of coagulum. Thereafter further processed through large rollers. Crepe rubber is most often used for the manufacture of shoe soles and rubber boots and gloves. Depending on the thickness, density, degree of contamination, crepe rubber can be classified in many grades.
TSR (Technically Specified Rubber)

TSR is a newer form of grading rubber that has become popular in the past 30 years. This process grades rubber using technical specifications instead of visual methods.
History of Rubber Plantation in Sri Lanka

Sri Lankan rubber tree plantations are the result of colonization. When blight hit the coffee plantations in the 1870s, people tried new things to see if they would work.
Finally, the colonial office selected Ceylon (Sri Lanka) to cultivate rubber because of its geographical features and climate. The seedlings were planted at the botanical garden in Gampaha under the guidance of George Thwaites.
The first rubber tree in Ceylon flowered in the year 1881. After that, people started experimenting with tapping the trees to get rubber. In the year 1893, around 90,000 rubber seeds were supplied to planters throughout Ceylon. And by 1923, approximately 180,085 hectares of rubber were cultivated.
This is how rubber cultivation began in Sri Lanka. And over time, it became one of the country's most important agricultural products.
Who introduced rubber trees to Sri Lanka?
During colonization, Sir Joseph Hooker recommended Sri Lanka to carry out experiments based on rubber tree cultivation. Accordingly, he sent 38 cases full of 1919 rubber seedlings from Kew Gardens to Ceylon. Thus, it can be said that it was Joseph Hooker who introduced rubber plantations in Sri Lanka.
Where do rubber trees grow in Sri Lanka?
In Sri Lanka, people grow rubber in tropical lowlands in the wet zone below 1400 ft altitude. Here, the size of a rubber holding can vary a lot. According to how much land is used, there are two types of rubber cultivation. Land areas that are below 8 hectares are considered smallholders. On the other hand, plantations that are 8 hectares or more are considered estates.
Sri Lanka's rubber plantations are mostly concentrated in the wet zone, with a total land area of 127,500 hectares. The main rubber growing districts in Sri Lanka include:
Kegalle
Gampaha
Rathnapura
Kalutara
Colombo
Galle
Matara
Kandy
Matale
Kurunegala
In addition, there are 19 regional plantation companies that manage around 47,000 hectares of rubber land. So, out of the total 115,300 hectares, about 25,700 hectares are immature, and the balance 89,600 hectares are mature.
Rubber production in Sri Lanka
Sri Lanka was once the 4th largest rubber producer in the world. But over time, the rubber industry slowly disappeared. Now, Sri Lanka is the 13th largest producer of natural rubber in the world.

The country is not just a producer of raw rubber but also produces a variety of value-added products using natural rubber. This includes:
Latex mattress
Latex mattress toppers
Latex pillows
Latex gloves
Rubber bands
Solid tires
Footwear
Does Sri Lanka export rubber?
Sri Lankan rubber is world-renowned for its premium quality and durability. The country exports rubber, both in raw and value-added forms. However, the amount of rubber exported each year is only around 8000 metric tons - which doesn't seem like a lot when you consider that rubber tree plantations cover more than 20% of the island!

Sri Lankan rubber and rubber-based products are mainly sold in the USA, Germany, Belgium, and the UK. Sri Lanka also exports semi-processed rubber to countries like Pakistan, Japan, and Germany.
A list of Rubber Products in Sri Lanka
Rubber Gloves: Various types of rubber gloves, including medical, household, and industrial gloves, are produced in Sri Lanka.
Rubber Mats: Rubber mats used for flooring, doormats, and anti-slip surfaces are common products in Sri Lanka.
Rubber Seals and Gaskets: Rubber seals and gaskets are widely used in industries such as automotive, construction, and manufacturing.
Rubber Hoses: Sri Lanka manufactures rubber hoses used in various applications, such as automotive fuel lines and industrial fluid transfer.
Rubber Footwear: Sri Lanka produces a range of rubber footwear, including flip-flops, sandals, and rain boots.
Rubber Belts: Rubber belts are used in conveyor systems and power transmission applications.
Rubber Profiles: Extruded rubber profiles are used in applications like weatherstripping, edge protection, and sealing.
Rubber Wheels and Tyres: Sri Lanka is known for producing rubber wheels and tyres used in bicycles, motorcycles, and various vehicles.
Rubber Sports Equipment: Rubber products like rubber balls and other sports equipment are also manufactured in Sri Lanka.
Rubber Toys: Sri Lanka produces rubber toys for children, including rubber ducks and other bath toys.
Rubber Floorings: Rubber floorings used in gyms, playgrounds, and other commercial or industrial settings are also made in Sri Lanka.
Rubber Bushings: Rubber bushings are used in automotive and industrial applications to dampen vibrations and provide flexibility.
These are just a few examples of the diverse range of rubber products manufactured in Sri Lanka. The country's strong rubber industry and skilled workforce contribute to the production of high-quality rubber goods that are exported globally.
Processing of Rubber in Sri Lanka
Smartness and Good Order 2
Be able to march 100 meters correctly with the Patrol. Be able to do Squad drill such as marking time, and drills with the staff etc.
First Aid 2
Explain what D.R.A.B.C. stands for (i.e. D-Danger, R-Response ,A- Airway clear, B-Breathing, C-Circulation). Explain how C.P.R is given. Show three Methods of carrying a casualty with the help of another, and also demonstrate Fireman’s lift

The practice of first aid is often said to be one of 'common sense' and in many ways this is true, for example, if someone is bleeding then the first thing that you want to do is to stop it! No text book (or information sheet!) is a substitute for attending a first aid training course if you wish to progress further than the few simple procedures mentioned here. In Scouting we are involved in activities all the time, which can potentially result in accidents whether indoors or outdoors and so it is desirable that we all have a basic understanding of first aid.
What is DRABC?
The DRABC procedure or the primary survey will allow you to establish what level of first aid you need to administer and if you need to call the emergency services. First aiders split the primary survey into the steps D-R-A-B-C, you can remember this easily by remembering DR ABC.
What does DRABC stand for?
DRABC stands for Danger, Response, Airway, Breathing and Circulation. As a First Aider, when you encounter a casualty, you need to do the initial DRABC procedure, otherwise known as the primary survey.
What are the main objectives of first aid?
Before even thinking about administering any first aid, it is good to know what you are doing. As a calm and measured first aider, you need to think about the 3P’s… yes another acronym.
First aid is all about:
Preserve life – you are preventing that person from losing their life.
Prevent further injury – you don’t want the casualty to become even more injured. Make sure that the casualty has a good supply of oxygen and that they are in a safe position. Ideally, casualties shouldn’t be moved, but if you have no other option maker sure you move them properly and carefully.
Promote recovery – you need to take the relevant steps to promote recovery; whether that is applying bandages or cold compresses or putting them into the recovery position. Continue promoting recovery until the emergency help arrives.
What are the 5 elements of a primary survey (DRABC)?
D – Danger
On the first step of DRABC, you need to determine whether it is safe to approach the casualty and that yourself and anyone else isn’t in a position also to become a casualty. For example; this could be stopping any oncoming traffic, looking out for live electricity, looking out for any places you could fall or trip over.
Once you can confirm there is no potential danger, you can begin to assess the casualty.
R – Response
Next, you need to try and get some response from the casualty so the casualty can tell you what is wrong with them. To do this, use the AVPU scale, which will help you scale the level of response from the casualty.
A – Alert: first of all, is the casualty moving or talking? If not, proceed to V.
V – Voice: Try speaking to the casualty loudly and clearly to see if they respond to speech. Make sure that you are in the casualty’s eye line so that they can see who is talking. If you get no response, proceed to P.
P – Place: Place your hand on the collarbone of the casualty and carefully but firmly shake them. At this point, you need to continue to speak to the casualty, making them aware of who you are. P can also stand for pain if the casualty responds as if they are in discomfort. If they do not show any signs of responsiveness proceed to U.
U – Unresponsive: at this point, you can assume the casualty is unresponsive.
A – Airways
Now you need to investigate why the casualty is unresponsive by checking their airway. To do this, you need to place the casualty on their back and tilt their head back. Place your hand on the chin and forehead and lightly tip back their head. With your fingertips on the chin of the casualty lift their mouth open to open the airways.
B – Breathing
When the airway is open; look out for any signs of normal breathing for 10 seconds. Look out for if the casualty looks to be breathing abnormally, infrequently or not at all. Start applying CPR if you notice any of these symptoms.
If the casualty is unresponsive but is breathing normally and isn’t in a state where they can be moved without damaging them further put them into the recovery position.
C – Call 1919,119 / Circulation
If you reach this point and the casualty isn’t breathing you need to get someone to call 119/1919 or if you are alone put your phone on speakerphone and do it yourself. Never start CPR until the emergency services have been called. If possible, get someone to go and get an AED while you speak to the emergency services and stay with the casualty if you are alone.
DRABC – D
Some people consider the defibrillation stage as its own step in the DRABC procedure, therefore calling it DRABCD. Using a defibrillator is key to keeping someone alive, and you need to take it seriously as a step.
CPR - Cardiopulmonary Resuscitation

Cardiopulmonary resuscitation (CPR) can help save a life during a cardiac or breathing emergency. However, even after training, remembering the CPR steps and administering them correctly can be a challenge.
Before Giving CPR
Check the scene and the person. Make sure the scene is safe, then tap the person on the shoulder and shout "Are you OK?" to ensure that the person needs help.
Call 119/1919 for assistance. If it's evident that the person needs help, call (or ask a bystander to call) 119, then send someone to get an AED. (If an AED is unavailable, or a there is no bystander to access it, stay with the victim, call 119/1919 and begin administering assistance.)
Open the airway. With the person lying on his or her back, tilt the head back slightly to lift the chin.
Check for breathing. Listen carefully, for no more than 10 seconds, for sounds of breathing. (Occasional gasping sounds do not equate to breathing.) If there is no breathing begin CPR.
CPR Steps
Push hard, push fast. Place your hands, one on top of the other, in the middle of the chest. Use your body weight to help you administer compressions that are at least 2 inches deep and delivered at a rate of at least 100 compressions per minute.
Deliver rescue breaths. With the person's head tilted back slightly and the chin lifted, pinch the nose shut and place your mouth over the person's mouth to make a complete seal. Blow into the person's mouth to make the chest rise. Deliver two rescue breaths, then continue compressions.
Note: If the chest does not rise with the initial rescue breath, re-tilt the head before delivering the second breath. If the chest doesn't rise with the second breath, the person may be choking. After each subsequent set of 30 chest compressions, and before attempting breaths, look for an object and, if seen, remove it.
Continue CPR steps. Keep performing cycles of chest compressions and breathing until the person exhibits signs of life, such as breathing, an AED becomes available, or EMS or a trained medical responder arrives on scene.
Note: End the cycles if the scene becomes unsafe or you cannot continue performing CPR due to exhaustion.
Carrying a Casualty
One Arm Carry

Single rescuer to lift a victim safely by arm carries. Rescuer holding the victim around the victim’s back and under the knees.
Two Handed Seat

This technique is for carrying a victim to the longer distances and can support an unconscious victim.
Pick up the victim by having both rescuers squat down on either side of the victim.
Reach under the victim's shoulders and under their knees.
Grasp the other rescuer's wrists.
From the squat, with good lifting technique, stand.
Walk in the direction that the victim is facing.
Three Person Carry

This technique is for lifting a patient into a bed or stretcher, or for transporting to short distances
Each person kneels on the knee nearest the victim's feet.
On the command of the person at the head, the rescuers lift the victim up and rest the victim on their knees.
If the patient is being placed on a low stretcher or litter basket:
On the command of the person at the head, the patient is placed down on the litter/stretcher.
If the victim is to be placed on a high gurney/bed or to be carried:
At this point, the rescuers will rotate the victim so that the victim is facing the rescuers, resting against the rescuers' chests.
On the command of the person at the head, all the rescuers will stand.
To walk, all rescuers will start out on the same foot, walking in a line abreast.
Fireman's Lift

Every man should know how to perform what is called the “fireman’s carry.” It’s an effective way to distribute someone’s weight, allowing you to haul them over long distances with minimal strain. Here’s how it’s done:
1. Raise the victim to a standing position. This is no easy task if they’re dead to the world. Start by rolling them on their stomach and kneel by their head. Stick your arms under their armpits and around their back. Raise the victim to his feet. Lift with your legs, not with your back.
2. Shift your weight to your right leg and stick it between the victim’s legs. Grab the victim’s right hand with your left, and drape it over your shoulder. With your head under the victim’s right armpit, wrap your arm around the back of his right knee. Squat down and position his body on your shoulders. Try to equally distribute his body weight on each side.
3. Grab the victim’s right hand with your right hand. Your left hand is free to judo chop would-be assailants.
4. Transport your victim.
Here’s a handy diagram:

IT Literacy 1
Basic knowledge on key input/output devices attached to the computer system
Knowledge about basic usage of a computer
Knowledge about basic storage methods of information
What is computer ?

Computer is a data processing machine which needs user’s instructions to perform any job. After processing the raw facts (called data), it produces useful information for the user.
But how do you give data and instructions to the computer and how it can return the useful information to you. To do all these, different types of input and output devices can be connected with the computer.
Input Devices
The devices which are used to give data and instructions to the computer are called Input Devices. Various types of input devices can be used with the computer depending upon the type of data you want to enter in the computer,
Examples
Keyboard
Computer mouse
Graphic tablet
Touchscreen
Barcode reader
Image scanner
Microphone
Webcam
Game controller
Light pen
Scanner
Digital camera
Keyboard

It is the most commonly used input device. It is used to enter data and instructions directly into the computer. There are 104 buttons on the keyboard which are called keys.
The various types of computer keyboards typically used by computer users for different purposes are a qwerty keyboard, a gaming keyboard, a virtual keyboard and a multimedia keyboard. Based on the connectivity options used for a keyboard to connect with a computer, it is classified as a wired keyboard, a wireless keyboard, a Bluetooth keyboard and an USB keyboard.

Mouse
Mouse is another input device which is commonly found connected with the computers. It is basically a pointing device which works on the principle of Point and Click. When the mouse is moved on the mouse pad, a light beam underneath reflect to give motion to the pointer on the screen.

The mouse is used in windows based programs, where the user can run the commands by pointing the objects with the help of pointer and clicking the buttons on the mouse. We also use mouse for drawing in paint and kid pix.
Most of the latest mouses, these days, include a wheel in the middle of two buttons that help us to scroll through documents more easily. we use our forefinger to move the wheel to scroll up or down in a document. Optical mouse uses red light to track the movement of mouse for moving the pointer on the computer screen. This type of mouse is more accurate and reliable than the traditional mouse.
Nowadays cordless mouse is very popular. it dose not have wires. it either uses Bluetooth technology to sends the data through the air to a receiver, usually plugged in USB port of the computer.
Scanner

A scanner or optical scanner is a hardware input device that optically "reads" and image and converts it into a digital signal. For example, a scanner may be used to convert a printed picture, drawing, or document (hard copy) into a digital file which can be edited on a computer.
A scanner can connect to a computer using many different interfaces although today is most commonly connected to a computer using a USB cable.
Output Devices
The devices which are used to display the results or information are called Output Devices. You can view the output on the monitor or you can print it on a paper using a printer. Monitor and the printer are the commonly used output devices.
Examples
Computer display
Printer
Projector
Speaker
Monitor

This is the most common output device connected with the computer to display the processed information. It looks like a TV and is also know as VDU(Visual Display Unit). Pictures are displayed by using a large number of very small dots on screen called pixels. The number of pixels that a monitor can show on its screen is referred to as the resolution of the screen
The two commonly used monitor types are:
Cathode Ray Tube (CRT)Monitor
Liquid crystal Display (LCD)Monitor
Add to Your knowledge LCD uses very small amount of electricity as compound to CRT.
The output produced on the screen is called Soft Copy Output because it cannot be retained for a long time.
Nowadays LCD monitors are more popular as their sharp picture quality. They are light weighted and flat screen monitors.
Printer

This is an important output device of the computer system. It gives a printed output of the results that appears on the monitor screen. Printed output is also called Hard Copy output because unlike monitor, this output can be preserved even if the computer is switched off.
Printers are of different types. On the basis of their printing techniques, printers are grouped as follows:
Character printer
Line printer
Page printer
Computer Memory
In computing, memory refers to the devices used to store information for use in a computer. The term primary memory is used for storage systems which function at high-speed (i.e. RAM), as a distinction from secondary memory, which provides program and data storage that is slow to access but offer higher memory capacity. If needed, primary memory can be stored in secondary memory, through a memory management technique called “virtual memory.” An archaic synonym for memory is store.
Volatile Memory - RAM

RAM stands for Random-Access Memory
Volatile memory is computer memory that requires power to maintain the stored information. Most modern semiconductor volatile memory is either Static RAM (see SRAM) or dynamic RAM (see DRAM). SRAM retains its contents as long as the power is connected and is easy to interface to but uses six transistors per bit. Dynamic RAM is more complicated to interface to and control and needs regular refresh cycles to prevent its contents being lost. However, DRAM uses only one transistor and a capacitor per bit, allowing it to reach much higher densities and, with more bits on a memory chip, be much cheaper per bit. SRAM is not worthwhile for desktop system memory, where DRAM dominates, but is used for their cache memories. SRAM is commonplace in small embedded systems, which might only need tens of kilobytes or less. Forthcoming volatile memory technologies that hope to replace or compete with SRAM and DRAM include Z-RAM, TTRAM, A-RAM and ETA RAM.
Non-Volatile Memory - ROM

Non-volatile memory is computer memory that can retain the stored information even when not powered. Examples of non-volatile memory include read-only memory (see ROM), flash memory, most types of magnetic computer storage devices (e.g. hard disks, floppy discs and magnetic tape), optical discs, and early computer storage methods such as paper tape and punched cards. Forthcoming non-volatile memory technologies include FeRAM, CBRAM,PRAM, SONOS, RRAM, Racetrack memory, NRAM and Millipede.

Types of Hard Drives
Parallel ATA (PATA)
Serial ATA (SATA)
Small Computer System Interface (SCSI)
Solid State Drives (SSD)
10 Digital Data Storage Devices for Computers
Hard Drive Disks
Floppy Disks
Tapes
Compact Discs (CDs)
DVD and Blu-ray Discs
USB Flash Drives
Secure Digital Cards (SD Card)s
Solid-State Drives (SSDs)
Cloud Storage
Punch Cards
6 Common Causes of Digital Data Loss
There are a number of ways that digital data can be lost. Here are six of the most common ways below. Generally speaking, the best way to protect data is to back it up in different places.
Accidental deletions: This is a very common problem and has happened to most people who deal with data. As well as deletion, reformatting a device can also result in the loss of stored information.
Power failures: Many electronic devices depend on electricity to function properly and maintain data. A loss of power can therefore be disruptive or destructive, especially in cases where the power loss is sudden. As well as power losses, power surges can also cause problems.
Spills, drops, and other physical accidents: Anything that causes physical damage to the storage device can corrupt data or prevent access to it. Even minor accidents, such as knocking over a cup of coffee, might be all it takes to cause the loss of large amounts of data.
Viruses and other forms of malware: Many modern forms of digital data storage are exposed to the internet. This means that the data risks being corrupted by malware, either directly, or via wider damage being caused to say, the operating system.
Theft: Whether through burglary, pickpocketing, mugging, or other forms of theft, you can lose the entire device and all the information that's on it.
Fires, floods, explosions, and other catastrophic events: These can all destroy vast amounts of data. This is one of the main reasons why data should never be backed up in the same building, but rather in a separate place.
Link Language Skills 1


Good habits 2
(Messenger of Peace Badge part-2)
Get involved in a small scale Community Service project with others. This could be in the school or in any other place. It should last at least one hour, and write at least 5 sentences about it in your log book. If possible, you may paste a photograph of that activity in the log book, or draw a picture of it.

Every Scout is a Messenger of Peace
Scouts do some amazing things, from simple community actions to large-scale projects such as preventing bullying in schools in the UK, helping street gangs in El Salvador to reduce violence, cleaning up a playground in Texas, and planting millions of trees all over Africa. Throughout its history, Scouting has inspired its millions of members to make a difference – applying their leadership to creating a better world. MoP is a World Scouting Initiative, which encourages Scouts to do community service and tell the story of their experience in order to inspire others to action. The Initiative has three components:
The Messengers of Peace Support Fund
The Messengers of Peace Educational Programme
The Messengers of Peace Network
These elements are connected: Today's technology enables us to exchange, and share inspiration through our Scouts Global Messengers of Peace Netowrk, for project ideas and ways to take action. The educational programme provides guidance on how to implement project ideas, and the Support Fund gives the necessary means for the National Scout Organisation’s projects.
More details about Messengers of Peace from here
What Is Community Service?

Community service is work done by a person or group of people that benefits others. It is often done near the area where you live, so your own community reaps the benefits of your work. You do not get paid to perform community service, but volunteer your time.
Community service can help many different groups of people: children, senior citizens, people with disabilities, even animals and the environment. Community service is often organized through a local group, such as a place of worship, school, or non-profit organization, but you can also start your own community service projects.
Many people participate in community service because they enjoy helping others and improving their community. Some students are required to do community service in order to graduate high school or to receive certain honors. Some adults are also ordered by a judge to complete a certain number of community service hours.
Why Should You Participate in Community Service?
There are numerous benefits to participating in community service, both for yourself and others. Below are some of the most important benefits of volunteering:
Gives you a way to help others
Helps improve your community
Can help strengthen your resume and college applications
Can be a way to meet new friends
Often results in personal growth
Gives you a way to gain work experience and learn more about certain jobs
How Should You Use This List?
This list of over one hundred community service examples is organized by category, so if you're particularly interested in working with, say, children or animals, you can easily find community service activities more related to your interests.
In order to use this list most effectively, read through it and make note of any community service ideas that match your interests and that you may want to participate in. Some considerations to keep in mind are:
Who would you like to help?
Is there a specific group of people or cause you are passionate about? Look for projects that relate to your passion and interests. You may also just want to perform particular community service activities that allow you to do hobbies you enjoy, like baking or acting, and that's fine too.
Do you want a community service activity that is reoccurring or a one-time event?
Perhaps you don't have enough time to regularly devote to community service. In that case, it may be better to look for opportunities that only occur once or sporadically, such as planning special events or helping build a house.
What kind of impact do you want to have?
Some people prefer to participate in community service activities that have a quantifiable impact, for example, activities where you know the specific number of kids you tutored, dollars you raised, or cans of food you collected. This is in contrast to activities that don't have such clear numbers, such as creating a garden or serving as a volunteer lifeguard. Some people prefer quantifiable activities because they feel they look stronger on college applications, or because they simply enjoy knowing their exact impact on the community.
What skills would you like to gain?
Many community service activities can help you gain skills. These skills can range from teaching to medicine to construction and more. If there is a particular skill you'd like to learn for future classes, jobs, or just out of personal interest, you may want to see if there is a community service activity that helps you learn that skill.
General Ideas
Donate or raise money for your local Red Cross
For your next birthday, ask for charitable donations instead of gifts
Hold a bake sale for your favorite charity
Read books or letters to a person who is visually impaired
Participate in a charity race
Volunteer to help at a charity auction
Contact a tree farm about donating Christmas trees to nursing homes, hospitals, or to families who can't afford to buy their own
Organize a car wash and donate the profits to charity
Help deliver meals and gifts to patients at a local hospital
Tutor children during or after school
Donate stuffed animals to children in hospitals
Organize games and activities for children in hospitals or who are visiting hospitalized relatives
Check this article for a wide range of Community Service Projects
Two night Camping
Have two night camping experience (In tent) and write the camp log in your Personal log book. The camp should be held in a safe place, with the permission of the parents, Scout Master, Principal etc.

Logging about the camps you have been to is a vise choice and each Scout is advised to do so.
One Day Hike of 12 KM
Not more than 4 Scouts should take part in this at a time. Scout Master should organize this hike and written instructions should be given to the participants. The instructions should include things to be done in the hike
The Scouts should take a back pack to carry, food, first aid etc.
There will be no night out camping in this hike
Prior permission of the parents and the school authorities to be obtained.
After the hike the participants should give separate verbal reports to the Scout Master about what happened during the hike. This should be the last test for the Scout Master’s Award.
Hike route must be drawn in standard format and the scale must be 1:25,000. May use A3 paper to submit the final map
Logging your hikes and the instructions is a must.
WHY KEEP A LOG OF A HIKE?
To give an accurate record of the route of the hike, so that anyone else reading it should be able to follow the same route without trouble.
To give a good report of the countryside through which the hike went, including the landscape, plant and animal life, human activity and anything of special interest, such as historical sites. This report should contain useful advice for future hikers and campers in that area.
To give an interesting report of the events of that particular hike, for the information and enjoyment of all who read it, and in particular for the Scout who went on the hike to keep as a souvenir.
A collection of the logs of the hikes that you have been on makes a good record of your Scouting, which you will be glad to have later on.
PUBLIC RELATIONS
Remember your good manners at all times in your dealings with the public. You should dress in such a way that you can be easily identified as Scouts. This will count in your favour because people are well-disposed towards Scouts. Don’t do anything to spoil that reputation!
Write letters of thanks to anyone who has been particularly helpful to you on your hike – this will be greatly appreciated and will mean that Scouts will be welcome there again.
Equipment for logging
You will need something in which to carry your logbook equipment while you are hiking, because you need the equipment constantly, and therefore cannot shut it up in your rucksack – and it is very inconvenient to try to carry things in your hands while walking.
You can make a cloth bag that can be slung around your neck, or an extra outside pocket on your jacket or one leg of your trousers.
You could also make a ‘field desk’ to give yourself something to press on when making notes or sketches. Use a piece of hardboard slightly larger than your notebook. Hold your papers on the board by means of rubber bands or bulldog clip, and fix a box on the board to hold pencils, paperclips and other small objects.
You should only make rough notes on the hike, so you can use any book or paper that you like. It is not a good idea to take your actual logbook on the hike with you, because it is clumsy and can get dirty and spoiled.
The final logbook should be of the kind that has a blank page opposite each lined page. The A4 size is best, as space on it is not so cramped. A ring clip folder with loose pages is also effective, as this enables you to make corrections and insertions easily, and it can also take bulky specimens, which a book cannot do. Keep the logs of all your hikes in the same book (or series of books) so that you can have a complete record of your Scouting hikes. A hard-covered book or file is therefore a good investment because it is durable. Sometimes you may have specimens that will not fit into a book. These can be presented separately, mounted on a sheet of cardboard or in some other convenient way.
Prepare to log your route in the following format:
Columns for Time, Distance
Route description, weather reports, observation notes and personal narrative
Rough Sketches on the important places you pass
Signatures from the junctions from an authorized personnel (Eg: Police Officer)

OBSERVATIONS TO BE RECORDED
Weather
Give a weather report at the start of each day and note any subsequent changes.
Route
Link your description to the map opposite so that the reader can picture where you went. You could put a number in your text to refer the reader to a similar number on the map that shows where a certain event or object occurred, like this: (Climbed over border fence by means of a stile (3).)
Historical interest
Buildings, Clock Towers, Roundabouts
Rough Notes
KEEPING ROUGH NOTES
You need a kind of shorthand to keep notes while you are hiking. A strip map is one useful method. For each leg of the hike, draw a straight line, indicate your bearing, and mark features and distances along it, like this: At more complicated places such as crossroads or junctions, draw a rough sketch map with the North marked

ILLUSTRATIONS
If the Instructions provide you to sketch a building, you may need your Sketching skills to sketch fast.

06 Months Service

Training period of Six months
Have a minimum training period of 06 months in a Patrol after completing the Membership Badge
Pay annual membership fee as a member of the World Organisation of the Scout Movement (WOSM)
Continue maintaining the Personal Log Book and help maintaining the Patrol Log Book
Proficiency Badges
The Scout should complete three (03) compulsory Proficiency Badges:
Happy Home Badge
2 Other Badges selected from any 2 groups other than from the Camp Craft and Public Service Groups
Scouts may do up to 06 more Proficiency Badges in addition to the compulsory 03 badges, but not from the Camp Craft and Public Service Groups.
Sea Scouts may complete a badge from Seaman’s Group and Air Scouts may complete a badge from the Airman’s Group as one of these badges.
If a Scout starts work on this Award as a Junior Scout and completed the Award as a Senior Scout, any relevant Junior badges done as a Junior Scout would be accepted as qualifying badges (i.e. some Scouts might have done Junior as well as Senior Badges, depending on his age when he/she did those badges).
Minimum age to start – 10 years and 09 months
Minimum age to complete – 11 years and 03 months
Minimum training period – 06 months
Should complete before 18 years
Interviewer – Scout Leader/Group Scout Leader
Once you are done with a requirement, do not hesitate to get it signed by your Patrol Leader/Seniors or the Scout Master/Group Scout Master
Signals
The Signals are mentioned in the NSM badge notes. Please refer to the section by clicking the below link
Semaphore signals
What is Semaphore?
It’s a way of communicating across long distances, by holding flags in different positions to represent letters or numbers.
Make a Semaphore flag

For this you will need either red and yellow A4 card or paper and some sticky tape.
Take one piece of red and one piece of yellow card or paper. You can make two flags from these.
Cut the card/paper diagonally from opposite corners as can be seen in the picture opposite.
Place the card/paper next to each other as seen in the picture and stick them together with the sticky tape on both sides.
You can add sticks to your flags if you want to. This can be done with lollipop sticks, kebab skewers or sticks from outside and attached using sticky tape
Sending signals
To send a Semaphore message correctly start by using the ‘Attention’ position and wait for the ‘Ready to receive’ position from the other team. When ready, start each word with the ‘Letters’ position and use the ‘Space’ position between each word. Finish the sentence with the ‘End of word’ position.
Receiving signals
To receive a message wait for the ‘Attention’ signal from the other team. When seen, reply with the ‘Ready to receive’ position. This is done by raising both flags straight above your head and then dropping them into the ‘Space’ position.
Alphabet

Active membership of a Patrol
The Patrol Method gives Boy Scouts an experience in group living towards their journey of being Good Citizens. The patrol, not the adults, make most of the decisions, including electing the patrol leader. The patrol method places responsibility on young shoulders and teaches boys how to accept it. The patrol method allows Scouts to interact in small groups where members can easily relate to each other. These small groups determine troop activities through elected representatives.
Some troops hold patrol meetings during their regular troop meetings. Others encourage patrols to meet on their own time, perhaps on a Sunday afternoon at the patrol leader’s home.
These are some activities to be carried out during patrol meetings:
Have the patrol leader report on what happened at the latest Patrol Leaders’ Council meeting
Plan upcoming outings, including food menus
Design patrol flag
Outfit and clean patrol box (Patrol corner)
Work on advancement requirements
Play a game or have fun in some way
Can patrols do activities outside of the troop, other than meet?
Yes.
They may have their own day activities, as well as a service project, or working on advancement, or proficiency badges, or things like that,. If they go overnight, they need to have adult supervision,
but they can do lots of things on their own. Service projects are a great thing for patrols to do.
What’s patrol spirit?
Patrol spirit starts with the patrol name, which members choose and says something about them. Patrols can come up with a flag, a totem, a yell, a song, whatever they want, something that makes them feel part of a team, just like a sports team.

What does the patrol leader do?
Plans, organizes, conducts patrol meetings activities.
Represents the patrol as a member of the Patrol Leader’s Council.
Keeps patrol members informed about upcoming events and deadlines.
Encourages patrol members to complete advancement requirements.
Sets a good example by living up to the Scout Oath and Law
The patrol method is not a way to operate a Boy Scout troop, it is the ONLY way. Unless the patrol method is in operation, you don't really have a Boy Scout troop
Good Patrol Spirit
Patrol members must know each other - in other words you must have a stable Patrol and not one where members from other Patrols are moved in and out every so often.
There must be pride in patrol traditions - the Patrol must have and use must be frequently made of the Patrol: - Name, Call, Yell or Song, Signature, Skill (good at pioneering, cooking, etc.), Flag or Badge, Corner or Den, Logbooks, equipment, Jobs delegated, Uniform.
Ensure the Patrol is successful. Somehow success brings the team together, making the members of the team glad to be a part of it. Success is not only in inter-Patrol competitions (though obviously you will work hard to win them), but also in projects you undertake. Plan well, and complete your plans.
Work hard to give attention to each Scout in the Patrol. Make friends with them. Get to know them and their family. Find out their interests. Most importantly help them to progress in their tests and along the Scouting Trail.
As a member of a Patrol, think of your Patrol as a team. A good tip is to think and talk about OUR Patrol, OUR den and not MY Patrol or my den. Talk with the Patrol members a lot, and try to keep them informed.
Try to build traditions of high standards in your Patrol. No one wants to belong to a sloppy show - everyone wants to be part of a success story.
Patrol-in-Council / Patrol Meetings
Patrol Meetings, also called Patrol-in-Council or Patrol Council Meetings, is a meeting between the Patrol Leader and the patrol. Patrol meetings may be held at any time and place. Many patrols set aside a portion of some evening meetings for its patrol to sit together and talk. Others encourage patrols to meet on a different evening, possibly at the home of a patrol member.
What is discussed ?
Programme - troop and patrol (camps, meetings, etc.)
Policy (the way things are done)
Problems
Decisions requested by the Patrol Leaders Council
Requests/suggestions made by the Patrol Leaders Council
Badge advancement within the Patrol
Notices (of coming events)
New Scouts
Planning future events & activities
Running the meeting
Meetings should be well planned and businesslike. Assistant Patrol Leaders bring the meeting to order and the PL reports on the issues discussed at the Patrol Leaders Council.
Decisions reached at these meetings should be brought to the attention of the Troop Scouter, whose responsibility it is, together with Assistants and PL's to make up a suitable programme. Plan and lead some patrol meeting and activities.
Keep your patrol members informed.
Give each member some specific task whenever possible.
Represent your patrol at Patrol Leader's Council.
Prepare the patrol to participate in all Troop activities.
Work with other Leaders to make your troop run well.
Know the abilities of each of your members.
Set a good example.
Wear the Scout Uniform correctly.
Be guided by the Scout Promise & Law.
Patrol Log
Maintaining and keeping logs of your meetings and activities is a way of analyzing the progress of the Patrol.

A few activities
Develop a secret code known only to your patrol. Use it;
Learn your patrol calls and signs;
Hold a tent pitching competition. Time your patrols. See if they can do it blindfolded with only one person instructing;
Practice making tea on top of a tree/in a tree hut;
30) Have a patrol camp, join with another patrol where possible;
34) Have regular log book inspections. Pay attention to spelling and grammar. Make sure daily logs are maintained and checked;
Make a patrol flag with your patrol colours. It could be used at patrol competitions, camps, and outside your tent at Camporee;
Learn how to change a flat tyre;
Make a water filter out of natural material;
Maintain a calendar of Troop birthdays and make a card as a Patrol and mail to the Scout;
Patrol Dens and Corners
Each Patrol should have a place of its own - somewhere it can meet and keep its treasures. The patrol corners are divided from the Troop administration. The Patrol can meet there when they wish and can decorate and furnish the place to their liking. The Patrol Corner is the core around which Patrol Spirit and tradition can be built.

The Patrol Corner should be decorated by the members of the Patrol with the records and trophies of its activities. It houses the Patrol's equipment such as signaling equipment, library, photos, games equipment, ropes, axes, first-aid kit, etc. It is the place where each generation of the Patrol can and will express its personality.
The maintenance and development of Patrol Dens or Corners can form an important training.
Commands
Since Baden-Powell first introduced the concept in “Scouting for Boys”, Scout Troops have always used specific formations to bring order and discipline to Troop Meetings. Most commonly, a Troop “falls in” to the formation at the beginning and end of meetings and on any occasion where special announcements are made.
However, many Scout Troops have forgotten the full utility of formations. In the past, there were many different formation shapes, each with a different purpose for different situations. Scouts were drilled in these formations, and had a lot of fun trying to make each formation faster and neater than the one before.
There is a lot of benefit to these formation drills, and it would be good to bring them back to more common use among Scout Troops. For one, drilling for quickness and neatness in formations helps set the right tone and spirit of the Scout meetings. It’s very important to establish a good Troop Culture. Formation drills can really help with that.
Smartness in uniform and correctness in detail seems a small matter to fuss about, but has its value in the development of self-respect, and means an immense deal to the reputation of the Movement among outsiders who judge by what they see
~Lord Baden Powell
This is very true. Sharp-looking and tight formations help each Scout to feel proud of the group they belong to.
These drills also reinforce the chain-of-command. The Patrol Leader’s responsibility is visually represented by the position he takes relative to the other members of his Patrol. The same is true of the positions of the Assistant Patrol Leader, the Senior Patrol Leader, and the Scoutmaster.
Finally, formation drills are just fun to do! Every time I’ve seen one in action, the Scouts take part enthusiastically. It really is a fun game to try quickly maneuvering between different formations.
Basic Guidelines
Patrol Leaders should have a defined position for each formation. In formations where the Scouts are arranged in front-to-back lines, the Patrol Leader is usually in the front. In formations where the Scouts are in left-to-right lines, the P.L. is usually either in the farthest position to the right, or he is standing out in front of his Patrol. Assistant Patrol Leaders should always be either next in line by the Patrol Leader or should be the opposite end-cap of the line.
In the past, the Scoutmaster mainly led the Patrols during the formations. This is a good practice for formal occasions, but I believe it is important for the Senior Patrol Leader to be in charge of drilling and training the Scouts in this matter.
Whoever leads the Troop in the formation obviously needs to be in front and visible. Wherever he calls the formation, he needs to make sure make sure there is enough room to accommodate the group.
There are several ways to call the formations. The first is by simply announcing them verbally. If done this way, the commands need to be loud and clear. The second way is to use a whistle or other audible signal. Make sure each of the signals are different enough to be easily distinguished. The third way is to use hand signals. This way has been very popular in the past. The leader usually give a single “alert” call, followed by the hand signals. It is silent and efficient, and it requires the Scouts to be ready and alert.
Troop Drill

Called by "Troop" or use troop call to attract attention and silence in Troop. A hand single is shown to get the Troop into required formation.
Troop then assumes the At Ease position-feet a comfortable distance apart, right hand clasped in left hand behind back, head up, eyes front.
"Attention"
Your weight should be distributed equally on the heels and balls of your feet. When you come to attention, bring your heels together smartly with your toes forming a 45 degree angle.
Keep your legs straight without locking your knees. Hold your body with your hips level, your chest lifted, and your shoulders square and even. Your arms should hang straight, but not stiff, with the backs of your hands outward. Curl your fingers so that the tips of our thumbs are alongside and touching the first joint of the forefingers. Your thumbs should be straight and along the seams of your trousers. The first joint of your forefingers should touch the trousers or skirt. Keep your head erect, and look straight to the front.
"At Ease"
Command: AT EASE
On the command AT EASE, you must keep your right foot in place and remain silent and in position in formation.
The hands are uncupped during this movement.
Once the arms are in the back of the body, your fingers are extended and joined, pointing towards the ground, palms facing outward.
The right hand is in the palm of the left hand. The right thumb is over the left thumb so they form a letter X.
Remain immobile and silent with head up and eyes straight ahead.
TURNS. From the Attention.
"Troop-Right Turn".
Turn on right heel and left toe-snap left foot up to right.
"Troop-Left Turn"
Turn on left heel and right toe-snap right foot up to left
"Troop-about Turn/Troop-Right-about-Turn"
Turn right about on right heel and left toe-snap left foot up to right.
Public Health
What is Public Health ?
Public health is defined as the “science and art of preventing disease.” The aim of public health is to prolong life and well-being by creating an organized effort to improve sanitation and prevent the spread of disease. Simply put, the goal of public health is to keep society from getting sick.
There are two main aspects of public health initiatives: prevention and treatment. Common public health initiatives to prevent disease and treat victims include:
Immunization of children.
Providing regular updates on disease outbreaks and spread.
Researching diseases and developing vaccines or cures.
Screening people for diseases.
Keeping our communities clean and unpolluted.
Providing health services to underserved areas.
Encouraging the reduction of unhealthy behaviors like smoking, drinking, and drug use.

Refer via https://www.healthline.com/health/alcohol/effects-on-body
Promoting healthy behaviors like exercise, nutritious diet, and stress reduction.
How Diseases Are Contracted
Although the odds of contracting a serious illness have been relatively low in modern times, there are still many ways that diseases, infections, and illnesses can spread. For instance:
Escherichia coli (E. coli) can be contracted by consuming contaminated food or water.
Tetanus can be spread through cuts r wounds from infected objects (like rusty metal).
HIV/AIDS is spread through infected blood or unsafe sexual contact.
Malaria is most often spread through mosquito bites.
Salmonellosis can be contracted after consuming undercooked meats, or by being exposed to an infected animal such as a cat, dog, or reptile.
Lyme disease is most commonly spread through tick bites.

Alcohol Poisining

Because of how alcohol is metabolized in the body, consuming excessive amounts of alcohol in a short time can be deadly. Respiratory, heart rate, body temperature, and gag reflex might all be adversely affected and could lead to a coma or death in some instances.
It is also possible for adults or children to accidentally or intentionally consume alcohol-containing household products, resulting in alcohol poisoning. Knowing what to do and how to go about if somebody in your presence or at a social event shows signs of alcohol poisoning is helpful and may even save a life.
Who is At Risk of Alcohol Poisoning?
Alcohol poisoning can happen to anyone, regardless of age, gender, weight, or alcohol tolerance. Alcohol poisoning is caused by drinking large quantities of alcohol in a short space of time.
Signs of Alcohol Poisoning
Confusion, incoherence, and stupor
Unconsciousness or coma
Unresponsiveness
Vomiting, that often continues even if the person is unconscious
Erratic or drastically slowed breathing
Low body temperature
Seizures
Pale or blue-tinged skin color
Treatment for Alcohol Poisoning
Some people may be embarrassed or scared to visit an emergency room to get help for a friend that they suspect has alcohol poisoning.However, the risk of embarrassment, cost, or reproach from friends and family is far lower than the risk of death.Although the person with suspected alcohol poisoning must go to the hospital immediately, there are some steps to take while en route or waiting for an ambulance:
Ensure that the person stays on their side if they are lying down, to reduce the risk of death from choking on vomit
Monitor their breathing and try to keep them conscious if possible
Never leave the individual alone or unattended


